Setting up Failover - Deploy Phase
In the previous microlearning, we discussed what needs to be done in the Create phase to enable failover for systems that are configured to have them in the Design phase. Next to that, we also discussed that setting up this failover functionality in your model requires you to execute some steps in your Design, Create, and lastly Deploy phase. Picking up from what we have toggled in the Create phase, in this microlearning, we will focus on the steps and configurations that you have to make in the Deploy phase to activate the active/passive failover functionality.
Should you have any questions, please get in touch with academy@emagiz.com.
1. Prerequisites
- Intermediate knowledge of the eMagiz platform.
2. Key concepts
This microlearning describes what configuration that you will have to do in the Deploy phase, based on what you have configured in the Design and Create phase, to enable failover for systems connecting with your model. The grouping and failover functionality is relevant when faced with maintenance and outages of systems connected to your model. The failover functionality assists in that case and allows you to have a fallback option on an active connection.
3. Deploy Phase Configuration
3.1 Deploy Architecture
After finishing up your configuration in the Create phase, you can then move to your Deploy>Architecture. Here, you will see the new router containers, which we have seen in the Design>Architecture, to be added to your external machines. When you press "Start Editing" in this page, and then press "Apply to environment", you will be faced with a pop-up page that informs you that these router containers will be created for this specific environment as shown in the screenshot below.

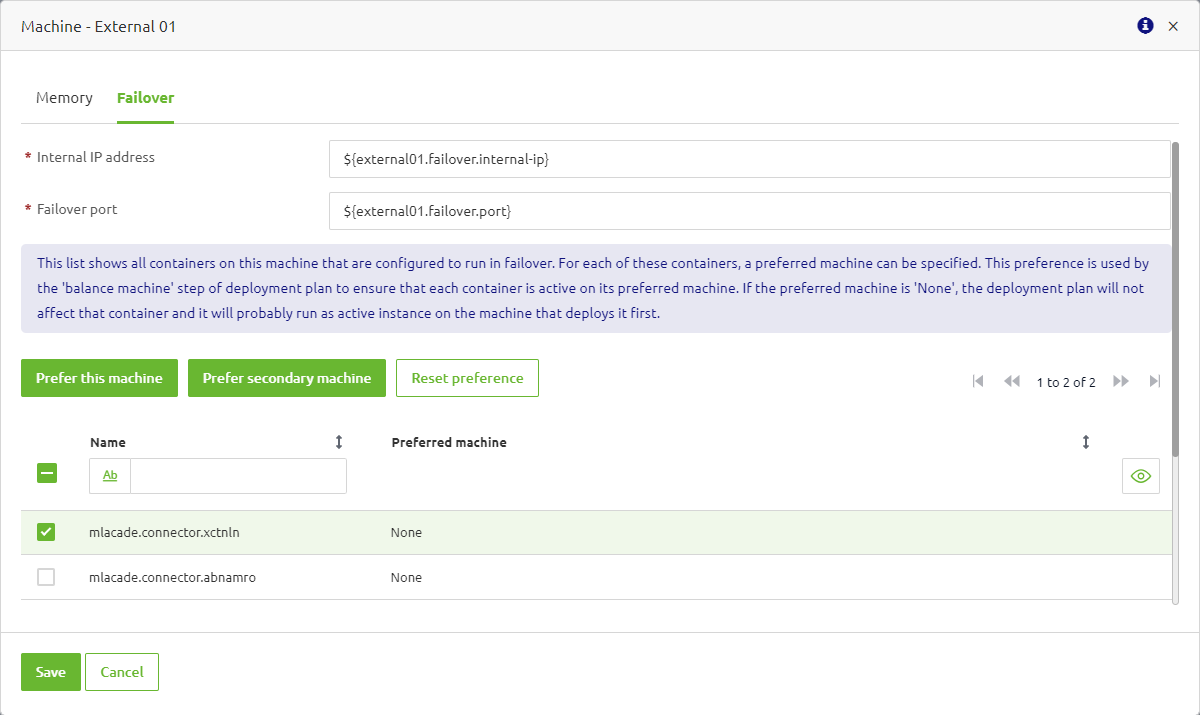
Once you have applied the changes, when you go to the "Details" of each of those machines via right-clicking them, then you can find and set for each failover runtime the preferred machine to be the leader. As an example shown in the screenshot below, there are two runtimes that are enabled for failover and you can select whether that runtime running in that "External 01" machine is the preferred leader. Another option is to set the runtime that you select as the backup, or reset it back to "None" if you want. Next to that, notice that here you can find the "Internal IP address" and "Failover port" fields, which have been pre-filled in with property placeholders. We will comeback to these properties later in the following sections.

When you have made your decision, and assuming that your machines are already deployed and running, then you can move to the other page discussed in the next section.
3.2 Deployment Plan
If this is the first time that you configure your failover setup, then the next step in Deploy is to check the Deployment Plan. Here, you can add a deployment step called "Balance failover", which, when executed, will trigger the failover container(s) to be running on its preferred machine as you previously configured them in Deploy>Architecture. (Next to that, you can also find the "Group" deployment step. Discuss this step here.)
3.3 Deploy Release
Once you have configured your Deployment Plan, then it is time to create a new release for your updated flows in the Deploy>Release page. As you might have noticed in the Deploy>Architecture earlier when opening the "Failover" tab in your machines' "Details", there are properties regarding the machines' "Internal IP address" and "Failover port". It is then becomes natural that you first need to fill in these property values in the environment that you are working on at the moment (i.e., Testing, Acceptance, Production).
To do this, you can click the "wrench" icon on the right hand side beside the "Create phase" release and then press "New". In the pop-up presented to you, you can click the "Name" input field and then search for the property placeholder names that you saw earlier. The idea here is that you fill in the IP address and the (open) port of the external machines. Thus, based on the example above, you can search for the keyword "external01.failover.internal-ip" and then select it. Afterward, you can set this property as global for simplicity and fill in the correct value. The screenshot below shows an example of the end result. Once you have done so, then you can do the same for the other property (i.e., "external01.failover.port") and as well as the properties for the second machine.
4. Key takeaways
...
5. Suggested Additional Readings
If you are interested in this topic and want more information, please read the help text provided by eMagiz and check out these links:
