Transformation - JSON to XML
In this microlearning session, we’ll explore how to effectively transform JSON into XML using the tools available in eMagiz. We’ll walk through the steps required to ensure that your input JSON messages are accurately transformed into valid XML outputs. eMagiz offers built-in support for this transformation process, leveraging features like default message formats, data models, and message mapping within the Design and Create phases. By the end of this session, you’ll have a clear understanding of how to manage these transformations and optimize your workflow in eMagiz.
Should you have any questions, please contact academy@emagiz.com.
1. Prerequisites
- Basic knowledge of the eMagiz platform
2. Key concepts
This microlearning centers around transforming JSON to XML
By transforming we mean: Making sure that the input message is transformed in a valid output message by defining how this should happen
eMagiz natively supports the transformation of JSON to XML with the help of:
- Default message format
- Data models in Design
- Message mapping in Design
- Create transformation in Create
- Support Objects
3. Transformation - JSON to XML
In this microlearning, we will focus on transforming JSON to XML within the tooling of eMagiz. With the help of this microlearning, you will know how to transform from JSON to XML with the help of the tooling in Design and Create. To illustrate the functionality we define what needs to be done in various phases of eMagiz.
eMagiz natively supports the transformation of JSON to XML with the help of:
- Default message format
- Data models in Design
- Message mapping in Design
- Create transformation in Create
- Support Objects
3.1 Default message format
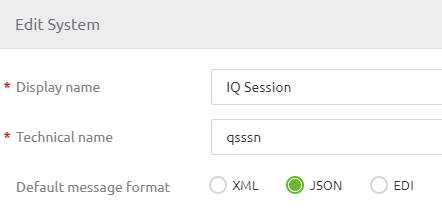
In the Design phase of eMagiz, you have the option on the system level to define the message format. In case a system speaks JSON you should set the value to JSON. If the system speaks XML you should set the value to XML.

Setting this up correctly will help you tremendously in the Create phase.
3.2 Data models in Design
Just as you are used to you simply create the correct system definition in Design as you would do when you would create a data model for XML message. If you are unsure how to do this please revisit the section on Design in the Crash Course Platform.
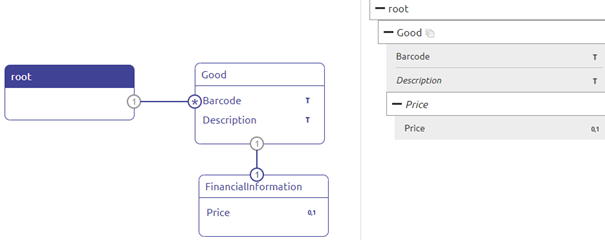
One extra thing to take into account when handling JSON is the root entity. Contrary to XML it is not mandatory to name your root entity when handling JSON. This means that when you create your data model you should verify beforehand whether the system to which you want to send your messages has a named root entity or not.
An example of a JSON message where the root entity is not named is shown below as the first example. The second example you see below is an example of a JSON message where the root entity is named.
{"ID": 1234}
}
{"Root":
{"ID": 1234}
}
If you need to send a name along with the JSON root in your output message you should create an extra entity in your data model with which your system message definition will start.

Regardless of whether the root of your output JSON message is named you also don't need to forget to define your message format. This can be done on the system level (in case all communication happens in JSON) or it can happen on the system message level. On the system message level, you have a button called Change message format which you can press while being in "Start Editing Mode". This action will show a pop-up. Here you can switch between XML and JSON as the message format. Ensure that the message format is JSON

3.3 Message mapping in Design
Just as you are used to you simply create the correct message mapping in Design as you would do when you would create a message mapping for XML messages. If you are unsure how to do this please revisit the section on Design in the Crash Course Platform.
3.4 Create transformation in Create
Just as you are used to you simply create the correct transformation functionality (filter, transformation, static input, etc.) as you would do when you would create the correct transformation functionality for XML messages. If you are unsure how to do this please revisit the section on Create in the Crash Course Platform.
3.5 Needed support objects
However, eMagiz needs to be told whether the input and/or output message is JSON. To tell this to the flow component you will need some support objects. If you have defined your default message format correctly (i.e. set it to JSON) eMagiz will auto-generate the relevant support objects for you.
Whether or not eMagiz has auto-generated the components the remainder of this section is interesting to take knowledge of. The crucial part of this is the virtual root. Remember we told you to create an extra entity in Design in your system message when the root of the JSON had a name? This is the reason why. As JSON can in theory have multiple roots which XML cannot have, yet we use the same underlying technology in eMagiz to transform both of them (JSON to JSON, JSON to XML, XML to JSON, XML to XML) you need to take this into account.
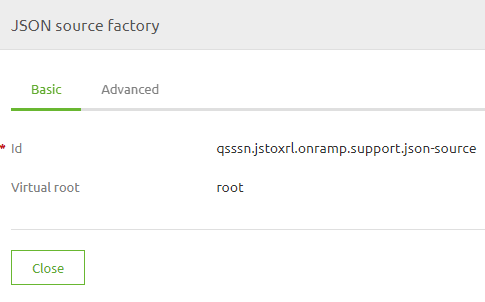
In this case, we want to transform from JSON to XML and therefore you need a JSON source factory within your flow. In this component, you need to define your virtual root based on your system message in Design. This is always the name of the root entity as defined as your system message in Design. In the example shown above, this will mean that the virtual root for this example is root.

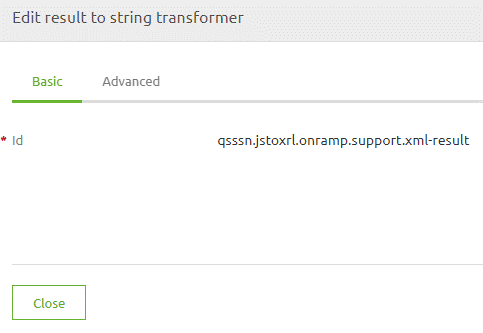
The JSON source factory is needed for your validation. However, to also support the transformation from JSON to XML you need an additional support object called Result to string transformer

Don't forget to properly link the support objects to the correct flow components for them to work. In the onramp, you need to link the JSON source factory to the validation component, and both support objects to the transformation.
After having done this you can use the unit testing functionality of eMagiz to test your work. If you are unsure how this functionality works please take a look at the segment on unit testing in the Crash Course Platform.
4. Key takeaways
- eMagiz natively supports the transformation of JSON to XML with the help of:
- Default message format
- Data models in Design
- Message mapping in Design
- Create transformation in Create
- Support Objects
- Ensure that you link the support objects correctly
- Don't forget to define the message format
