Message redelivery
Below you will find a document describing the migration path to activate message redelivery on a flow that is already available in Create. As the flow is already available in Create you don't want to loose your progress when you want to activate message redelivery. In those instances several manual steps are needed to configure the flow(s) correctly in Create to make the message redelivery functionality work for you. For an explanation on how you can configure message redelivery when you have not transferred the flow to Create please check out this microlearning.
Should you have any questions, please get in touch with academy@emagiz.com.
1. Prerequisites
- Advanced knowledge of the eMagiz platform
- A thorough understanding of your eMagiz model
2. Key concepts
- This migration path allows you to migrate a specific flow that is already available in Create to use Message Redelivery
- Flows that are not yet in Create should be configured via the default approach. This approach can be found microlearning
- If this is your first configuration of message redelivery on an existing model you need to reset the JMS flow to make the functionality work.
3. Technical Migration Path
Below you will find a document describing the migration path to activate message redelivery on a flow that is already available in Create. As the flow is already available in Create you don't want to loose your progress when you want to activate message redelivery. In those instances several manual steps are needed to configure the flow(s) correctly in Create to make the message redelivery functionality work for you. For an explanation on how you can configure message redelivery when you have not transferred the flow to Create please check out this microlearning.
3.1 Migrate first step of process
The first step of this migration path is to identify the process you want to migrate. The process is most likely an offramp and exit combination that sends data to a specific system. In this update step, you will first open the offramp flow to change the component that puts data on the exit queue. Between the async. and the technical name of the system to which you want to send data (i.e. .sap) you need to add the word dla to get the following result.
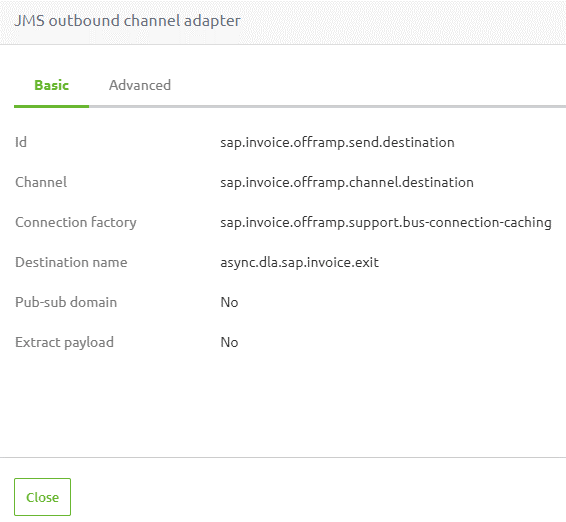
Once you have done this you can create a new version of the flow in question.
3.2 Migrate second step of process
Once this is done you need to open the subsequent step in your process that reads from that queue. This will most likely be an exit flow. In this flow we need to change several things to make the message redelivery functionality work. At first we need to change the first component in the flow that reads from the queue. In here the queue name needs to match the queue name you have just changed in the first step of this migration path. In this example this will be async.dla.sap.invoice.exit.
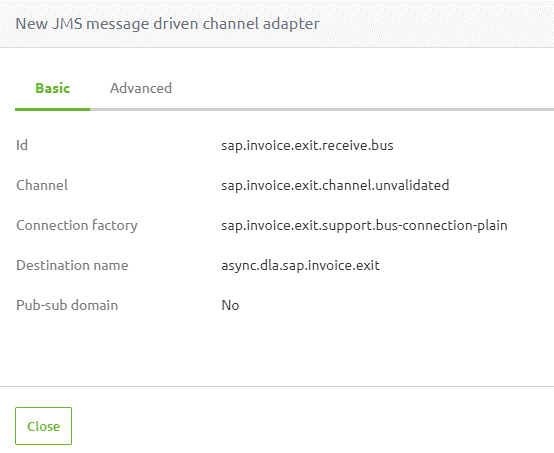
3.3 Change (Custom) Error Handling
Subsequently, you need to change the outbound component called "send.error". After opening this component, navigate to the "Advanced tab" and add a "Expression evaluating advice" to the component. In the pop-up that follows fill in the following expression in the "on success expression" field:
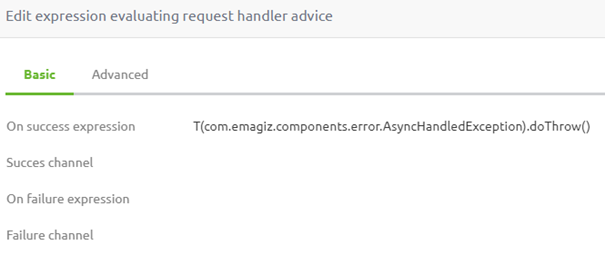
Once you have filled in this expression a final step is needed on this pop-up. To execute this step please navigate to the "Advanced" tab and activate the option called "Propagated evaluation failures". This will ensure that once the message is succesfully delivered to the eMagiz error process the message will be placed on the queue designed to handle failed messages within the message redelivery functionality.
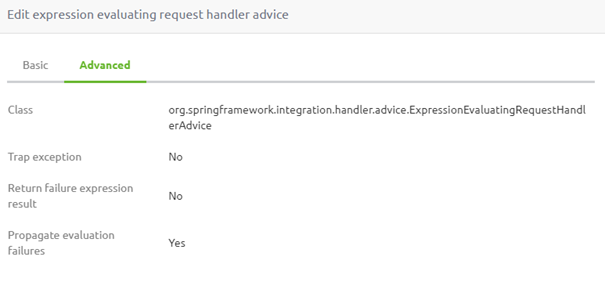
After saving this last step you can create a new version of this flow aswell so they both can be deployed.
3.4 JMS Reset
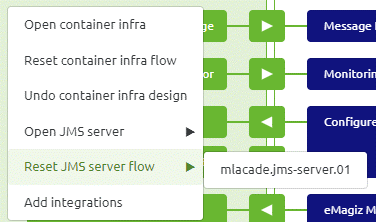
To make sure that the dead letter address is registered on JMS level and the address settings on queue level are correctly changed a reset of the JMS might be needed to activate the message redelivery functionality on your model. To reset the JMS open the context menu within the Create Overview and select the option called "Reset JMS flow".
3.5 Create a new release
After the migration is finished, eMagiz will have created new versions of all flows on the flows you just migrated. The next step would be to include these changes in a new release so they can be deployed. After adding the new flow versions to the release, ensure the release is "set as active."
3.6 Deploy changes
Via the standard process you can now deploy your changes to your environment and message redelivery will be active and working for the flow you have just migrated.
4. Key takeaways
- This migration path allows you to migrate a specific flow that is already available in Create to use Message Redelivery.
- Flows that are not yet in Create should be configured via the default approach. This approach can be found microlearning.
- If this is your first configuration of message redelivery on an existing model you need to reset the JMS flow to make the functionality work.
