Install Docker for Windows
In this microlearning, we will focus on how an on-premises server can be prepared for a eMagiz Deploy agent installation.
Should you have any questions, please contact academy@emagiz.com.
1. Prerequisites
- Advanced knowledge of the eMagiz platform
- Good understanding of eMagiz runtimes in general
2. Key concepts
In the new runtime architecture of eMagiz, Docker technology is used to deploy runtimes. eMagiz creates specific runtime images that contain the eMagiz runtime, and can be deployed in dockerized environments.
In the below section the Windows and Linux variants are described in terms of how to prepare the server to allow the eMagiz Deploy agent to be installed. That agent allows to download images from the eMagiz infrastructure.
3. On-premises deployments
3.1 General requirements
These are the general requirements to allow the installation of the eMagiz Docker agent:
- Ensure access to the following URLs is enabled
- registry.emagiz.com:443
- controlplane.emagiz.com:8000
- Preferably the entry should be *.emagiz.com
3.2 Installation requirements Linux
Whenever Linux is selected as operating system, the latest version of Ubuntu will work. Other Linux distributions will also work such as Debian or Red Hat.
Step 1: Install linux distribution
Follow the relevant steps in section 3.4
Step 2: Install eMagiz Deploy Agent
Install the eMagiz Deploy agent as can be found in this microlearning
3.3 Installation requirements Windows Server 2022
The steps below will install a linux subsystem under Windows. In that Linux system, Docker and Java will be installed. Please note that the Windows server needs to be able to run Virtualized (either via BIOS setting or via Nested Virtualization).
Step 1: Install linux distribution
sudo apt-get update
sudo apt install --no-install-recommends apt-transport-https ca-certificates curl gnupg2
. /etc/os-release
Step 2: Configure linux system
Please see section 3.4 for these these steps
Step 3: Update wsl config file
In this step we need to add or update the WSL config file that manages the resources of the Linux subsystem. Important resources to manage are the assigned memory and number of processors. For memory we recommend to review the mempory settings for the runtime that need to run on this server and add 762 MB to the total value of the heap and non-heap of these runtimes. For processor we recommend to set the value to 2 - depending on the amount of processors available on that machine
First, locate the config file or add it to the location %USERPROFILE%. The name should be .wslconfig (no extension)
# Settings apply across all Linux distros running on WSL 2
[wsl2]
# Limits VM memory to use no more than 4 GB, this can be set as whole numbers using GB or MB
memory=16GB
# Sets the VM to use two virtual processors
processors=2
Step 4: Auto start the linux subsystem when Windows server restarts
* Type shell:startup and press enter
* Add or update file start_wsl.bat
* Add following line into the document and save file
* wsl sudo /usr/bin/dockerd
Step 5: Install eMagiz Deploy Agent
Install the eMagiz Deploy agent as can be found in this microlearning.
3.4 Installation steps to configure Linux subsystem
Step 1: Install Docker
echo "deb [arch=amd64] https://download.docker.com/linux/${ID} ${VERSION_CODENAME} stable" | sudo tee /etc/apt/sources.list.d/docker.list
sudo apt update
sudo apt install docker-ce docker-ce-cli containerd.io
Step 3: Ensure Docker is autostarted with WSL
#Add following lines to bashrc
DOCKER_DISTRO="Ubuntu"
DOCKER_LOG_DIR=$HOME/docker_logs
mkdir -pm o=,ug=rwx "$DOCKER_LOG_DIR"
/mnt/c/Windows/System32/wsl.exe -d $DOCKER_DISTRO sh -c "nohup sudo -b dockerd < /dev/null > $DOCKER_LOG_DIR/dockerd.log 2>&1"
Step 4: Add user to Docker group
#Add following lines
# Don't ask for password
%docker ALL=(ALL) NOPASSWD: /usr/bin/dockerd
Step 5: Ensure safe IP range for WSL
This step ensures that the IP address range of the machine doesn't conflict with any IP address of the Linux subsystem. Below the recommended values depending on the range which can be filled in the value <ip-address> below:
- 10.0.0.1/8
- advised value 10.25.0.1/16
- 172.16.0.1/12
- advised value 172.16.0.1/16
- 192.168.0.1/16
- advised value 192.168.0.1/16
#Add following lines
{"bip": "<ip-address>"}
3.5 Installation requirements Windows Server 2019 version 1806
These are the requirements to allow the installation of the eMagiz Docker agent:
- Enable Hyper-V in Windows Server
- Go to Server Manager, Manage (top right), enable roles and features, select the desired roles and server selections. In the Features section, enable Hyper-V.
- Restart windows
- Cross check is WSL 2.0 is installed
- Use this command to get WSL 2.0: Enable-WindowsOptionalFeature -Online -FeatureName Microsoft-Windows-Subsystem-Linux
- Please follow the instructions for preparing a Windows 2022 installation in section 3.3
3.6 Installation requirements Windows Server 2012 R2
These are the requirements to allow the installation of the eMagiz Docker agent:
- Install & enable Hyper-V in Windows Server
- Go to Server Manager, Manage (top right), enable roles and features, select the desired roles and server selections. In the Features section, enable Hyper-V.
- Restart windows
- Download a ubuntu server 18.04 (https://releases.ubuntu.com/18.04/ubuntu-18.04.6-live-server-amd64.iso )
- Create a VM in HyperV.
- For this, choose Generation 1, the amount of memory you want to assign to ubuntu and thus to the containers. Please consider the overhead for memory as well (such as OS).
- Configure a virtual switch.
- Add a virtual Hard Disk with proper sizing (e.g. 30 GB)
- Install an operating system from bootable CD/DVD, ISO file
- Install ubuntu downloaded previously on the VM
- Install docker as per official ubuntu documentation (See https://docs.docker.com/engine/install/ubuntu/#install-using-the-repository) on the VM
- Go to the next section around installing the eMagiz agent
4. Key takeaways
- eMagiz uses runtime images to deploy emagiz runtime on dockerized environments. The runtime image holds all the information and components required to run the runtime
- eMagiz has a specific agent that manages the download of that image to the on-premises server
- The firewall of the on-premises environment should allow outgoing traffic without any restriction. In case that is not desirable, eMagiz can provide the addresses and ports needed to setup the right firewall rules.
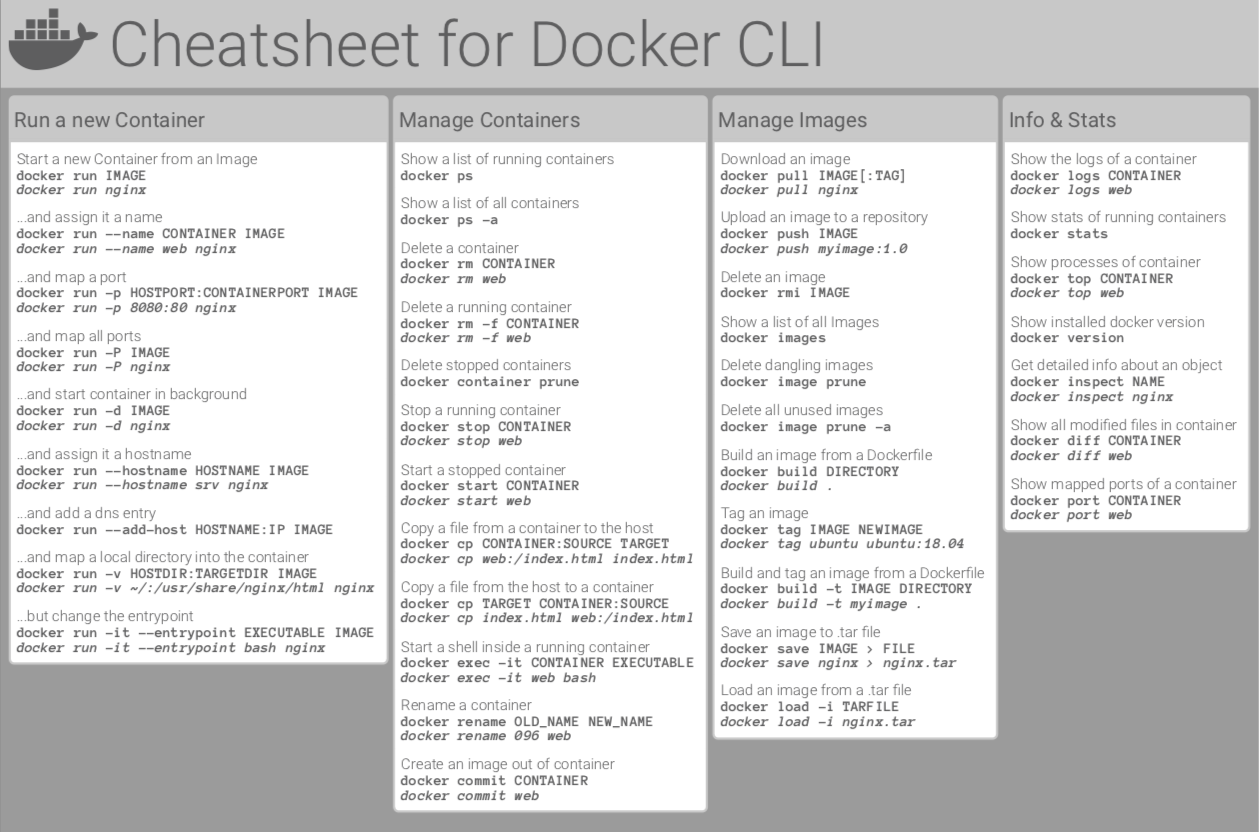
5. Suggested Additional Readings
- Docker command line cheatsheet: