
Using Mendix as producer
In this microlearning, we will focus on how you can utilize the eMagiz Connector, available via the portal, to produce data for topics managed within the eMagiz Kafka Cluster. By the end, you'll have a clear understanding of setting up connections, configuring producers, and utilizing the eMagiz Connector to streamline data transportation between systems.
Should you have any questions, please get in touch with us at academy@emagiz.com.
1. Prerequisites
- Basic knowledge of the eMagiz platform
- Basic knowledge of the Mendix platform
- Mendix project in which you can test this functionality
- A Kafka cluster to which you can connect.
- Access to the Deploy phase of your eMagiz project
- A connection between Mendix and eMagiz Designed, Created, and in the active release
- Using the "eMagiz Connector" in the Mendix Marketplace.
- Initial installation done.
- Initial configuration done.
2. Key concepts
This microlearning focuses on using the eMagiz Connector in Mendix.
- By using, in this context, we mean: Being able to produce data to topics that are managed within the eMagiz Kafka Cluster.
- By knowing how you can easily set up Mendix to produce data to topics, you have the option to better transport large volumes of data between several systems (i.e., two Mendix applications).
Some key concepts before you dive further into this microlearning:
- Producing data on a topic means that the external system, in this case, Mendix, writes data to a pre-defined topic where the data is stored temporarily to ensure that one or more other systems can consume the data.
3. Using the eMagiz Connector Module
With the help of the Mendix module (called eMagiz Connector) created by the eMagiz team, you can easily connect between Mendix and eMagiz for data integration. This microlearning will focus on producing data via a connection to the eMagiz Kafka Cluster. The next microlearning will focus on consuming data.
To use the eMagiz Connector in Mendix, you need to be able to do at least the following:
- Set up a connection to the external Kafka Cluster (i.e., the eMagiz Kafka Cluster) from Mendix
- Configure a Producer that can write (publish) data to a topic or configure a Consumer that can read (listen) data from a topic
Once you have configured these steps, consider how you want to transfer data from and to your data model. That part is excluded from this microlearning, as it focuses solely on how to build microflows in Mendix.
In the remainder of this microlearning, we will discuss the options through which you can functionality send messages utilizing the eMagiz Kafka cluster.
3.1 Producing Messages - "String Variant"
To send data from Mendix, you must define several configuration options in the Mendix project. In this example, we will examine a simple configuration using a string variable to represent the payload. Later, we examine the variant using a Mendix object as the starting point for sending data.
In eMagiz, you will see a flow in Create that you cannot edit, as the autogenerated functionality provided by eMagiz is all that is needed. Once done, ensure the flow is transported to Deploy and is ready to be used in a Mendix application by adding it to a release.
In parallel, the Mendix application must be developed to handle the creation of a message and the ability to send it to the eMagiz Kafka cluster, whether earlier or later.
3.1.1 Startup action
In Mendix, you must add the "StartStringProducer" Java Action to the after startup flow. The most important configuration items are as follows.
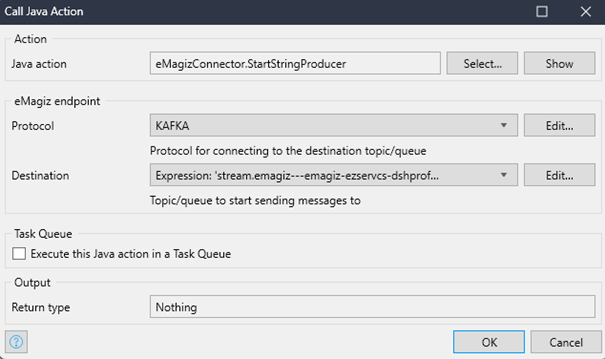
- The destination (i.e., the topic to which you want to produce the messages). This can be supplied by the eMagiz developer, found under Deploy -> Mendix Connectors, assuming you have access to the eMagiz model in question, or viewed in the eMagiz Catalog.
3.1.2 Send action
In addition to the start action, you must also configure a Send action and include it in the microflow responsible for sending data to eMagiz. In this case, you must take the "SendString" Java action. The most important configuration items are as follows.
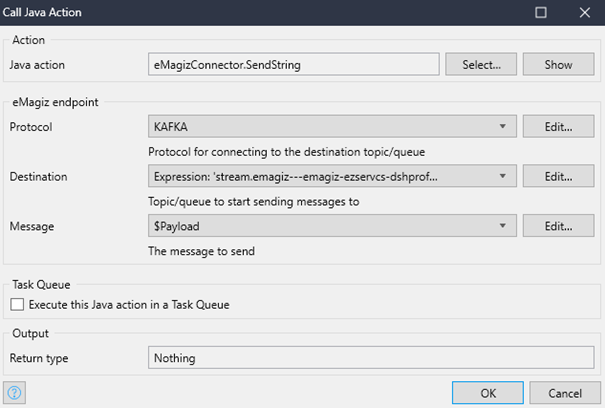
- The destination (i.e., the topic to which you want to produce the messages). This can be supplied by the eMagiz developer, found under Deploy -> Mendix Connectors, should you have access to the eMagiz model in question, or viewed in the eMagiz Catalog.
- The export object (the string payload you want to send to eMagiz). This definition can be determined by the eMagiz developer (and then shared with the Mendix developer) or determined by the Mendix developer (and then shared with the eMagiz developer).
3.1.2.1 Retry behavior (Optional)
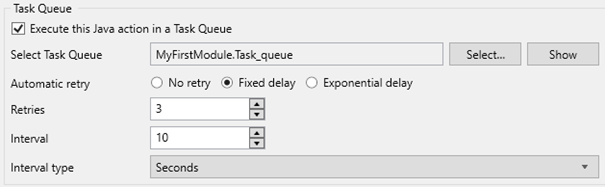
When an error occurs during message sending with the eMagiz Connector, no retry behavior is implemented by default. Depending on the application's structure and error-handling configuration, this could result in data loss. This problem can be mitigated by executing the send Java action in a Task Queue. This Task Queue can be configured with retry behavior to maximize the chance of delivery.
You must create a Task Queue to configure retry behavior when sending a message. The Mendix Documentation provides instructions on how to do this.
After creating the Task Queue, open the Java action in your microflow, which you are using to send messages. A checkbox at the bottom of this screen says, “Execute this Java action in a Task Queue.” Enable this checkbox and select the Task Queue you just created. After choosing the Task Queue, the option to configure retry behavior will be shown. Depending on your use case, you can select a fixed delay or an exponential back-off. The difference between these options can be found on Mendix's previously mentioned documentation page.
3.2 Producing Messages - "Object Variant"
To send data from Mendix, you must define several configuration options in the Mendix project. In this example, we will examine the complex configuration using a Mendix object in conjunction with an export mapping that represents the payload.
In eMagiz, you will see a flow in Create that you cannot edit, as the autogenerated functionality provided by eMagiz is all that is needed. Once done, ensure the flow is transported to Deploy and is ready to be used in a Mendix application by adding it to a release.
In parallel, the Mendix application must be developed to handle the creation of a message and the ability to send it to the eMagiz Kafka cluster, whether earlier or later.
3.1.1 Startup action
In Mendix, you must add the "StartMessageProducer" Java Action to the after startup flow. The most important configuration items are as follows.
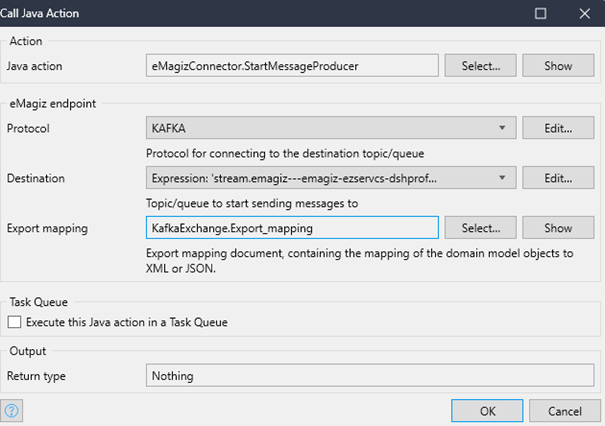
- The destination (i.e., the topic to which you want to produce the messages). This can be supplied by the eMagiz developer, found under Deploy -> Mendix Connectors, should you have access to the eMagiz model in question, or viewed in the eMagiz Catalog.
- The export mapping (the mapping of your data entities to a JSON or XML payload you want to send to eMagiz). The definition of the JSON/XML can be determined by the eMagiz developer (and then shared with the Mendix developer) or determined by the Mendix developer (and then shared with the eMagiz developer).
3.1.2 Send action
In addition to the start action, you must also configure a Send action and include it in the microflow responsible for sending data to eMagiz. In this case, you must take the "SendMessage" Java action. The most important configuration items are as follows.
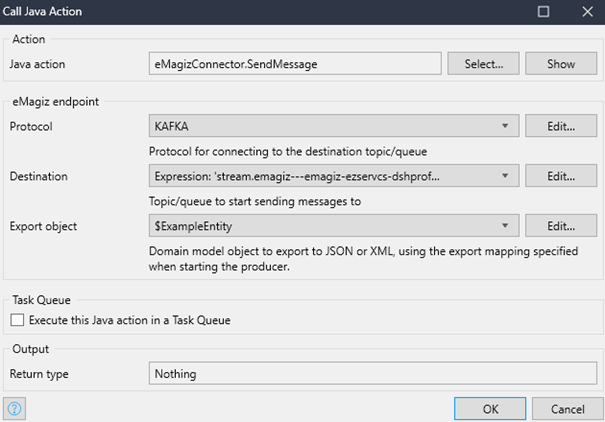
- The destination (i.e., the topic to which you want to produce the messages). This can be supplied by the eMagiz developer, found under Deploy -> Mendix Connectors, should you have access to the eMagiz model in question, or viewed in the eMagiz Catalog.
- The export object (the string payload you want to send to eMagiz). The definition of the JSON/XML can be determined by the eMagiz developer (and then shared with the Mendix developer) or determined by the Mendix developer (and then shared with the eMagiz developer).
3.1.2.1 Retry behavior (Optional)
When an error occurs during message sending with the eMagiz Connector, no retry behavior is implemented by default. Depending on the application's structure and error-handling configuration, this could result in data loss. This problem can be mitigated by executing the send Java action in a Task Queue. This Task Queue can be configured with retry behavior to maximize the chance of delivery.
You must create a Task Queue to configure retry behavior when sending a message. The Mendix Documentation provides instructions on how to do this.
After creating the Task Queue, open the Java action in your microflow, which you are using to send messages. A checkbox at the bottom of this screen says, “Execute this Java action in a Task Queue.” Enable this checkbox and select the Task Queue you just created. After choosing the Task Queue, the option to configure retry behavior will be shown. Depending on your use case, you can select a fixed delay or an exponential back-off. The difference between these options can be found on Mendix's previously mentioned documentation page.
4. Key takeaways
To call a topic from Mendix, you need the following:
- The destination (i.e., the topic from which you want to retrieve the information)
- Execute microflow (the microflow that will process the data that needs to be sent to eMagiz)
- Optionally, you can define an export mapping and subsequent options.
- Optionally, you can use the "task queue" functionality of Mendix to send messages via this task queue to eMagiz to safeguard against connection problems.
5. Suggested Additional Readings
If you are interested in this topic and want more information on it, please see the following links: