
SFTP Known Hosts
In an earlier microlearning, we discussed how to connect to an SFTP from eMagiz. Later on we zoomed in on an alternative security method to authenticate yourself at the SFTP. More on this can be found in this microlearning. In this microlearning, we want to expand our knowledge and look at a way to store the unique fingerprint of the SFTP to avoid that someone else can pretend to be the SFTP when you want to send data (i.e. a "man in the middle attack").
Should you have any questions, please get in touch with academy@emagiz.com.
1. Prerequisites
- Basic knowledge of the eMagiz platform
- Novice course on File-based connectivity
2. Key concepts
This microlearning is about SFTP security.
By SFTP security, we mean: Making sure that the SFTP we connect to knows that we are indeed eMagiz
- Each SFTP has a unique fingerprint that identifies the SFTP.
- To prevent a "man in the middle" attack, this fingerprint needs to be stored client side.
- There are two distinct methods to generate the known hosts file.
3. SFTP Known Hosts
In this microlearning, we want to expand our knowledge and look at a way to store the unique fingerprint of the SFTP to avoid that someone else can pretend to be the SFTP when you want to send data (i.e. a "man in the middle attack"). To retrieve the unique fingerprint of an SFTP you first need to connect to the SFTP in question. This way you can retrieve the unique fingerprint and secure it in a file for future use to prevent the "man in the middle attack".
There are two distinct ways of retrieving and storing the unique fingerprint of the SFTP in a "known hosts file". The first option is portal based and the second option is command line based. The preferred option is the portal based one. Do note that the first option only works if the SFTP is publicly accessible without any IP restrictions.
3.1 Known Hosts File Generation - Portal
3.2 Known Hosts File Generation - Command Line
The secondary option, when there are IP restrictions, provides you with the option to execute several commands after gaining access to the correct server to generate the known hosts file. These steps are detailed below.
- Gain access to the server in question from which you can reach the SFTP.
- Execute the following command (compatible with both Linux and Windows): ssh-keyscan -p [port] [host] > [known-hosts target path]
- An example would be: ssh-keyscan -p 22 localhost > C:\tmp\generated_known_hosts
- Navigate to the generated file and open it. The file should contain one or more lines in the format hostname/ip key-type value
e.g. 127.0.0.1 ssh-ed25519 AAAAC3NzaC1lZDI1NTE5AAICZPI5pQ6PSXgS4QOPsai2QjC2EcVjFejvUM5RMYOmwbwW - Open eMagiz and navigate to the flow where the file is needed.
- Upload the known_hosts file as a flow resource, and click on the "eye" icon to see its unique name.
- Define a property for the known hosts field in the SFTP (caching) session factory.
- Provide a value for the property upon deploying the release that follows the following structure: classpath:emagiz-resources/[filename]
- Provide a value for the property upon deploying the release that follows the following structure: classpath:emagiz-resources/[filename]
If you are looking for some introductory reading into certificates, please check this microlearning.
As the private key is yours, you can ask a trusted party to generate the key, or you could create it yourself. The latter part happens a lot when connecting to an SFTP. You could use a tool like PuttyGen to achieve this. As a result, you will have a keypair. The private key should be kept safely with you in eMagiz, and you need to share the public key with the SFTP server party. In this microlearning, I will not explain how PuttyGen works in detail. Instead, we will focus on the part in eMagiz. In eMagiz, we need to refer to the key file (linked under Resources), and we need to refer to the password we use to save our key file securely.
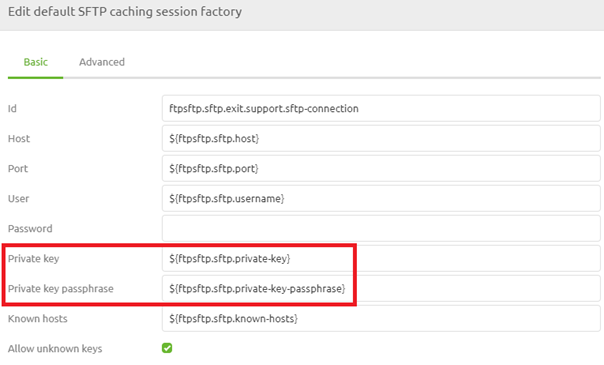
Note that the use of a password and a private key are mutually exclusive. So you need to either provide a password or a private key for authentication. In the help text provided by eMagiz, you can see how the reference to the key file should be made.
When you have configured these settings, you have finished the configuration in eMagiz. Now you could test whether the configuration is set up correctly between eMagiz and the SFTP. If this is not the case, eMagiz will notify you via the Manage phase, either as an error message or a log entry.
Using this setting gives the server the option to verify if the communication request came from eMagiz (or at least from the party that holds the private key of eMagiz). This is an additional security measure to ensure data integrity and quality.
4. Key takeaways
- Private key is unique per client
- Private key should only be known to the client
- Public key should be known to the SFTP (server), so they trust us when we set up the communication
- A private key comes with a passphrase
5. Suggested Additional Readings
If you are interested in this topic and want more information, please read the release notes provided by eMagiz. Furthermore, check out these links: