
Configuration REST web service
In this microlearning session, we will explore how to manually host a REST web service outside of eMagiz's API management layer. By the end, you will understand the steps required to configure a REST service, including best practices and key concepts, and how to handle various HTTP operations and errors effectively.
Should you have any questions, please contact academy@emagiz.com.
1. Prerequisites
- Intermediate knowledge of the eMagiz platform
2. Key concepts
This microlearning centers around configuring a REST web service.
- With configuration, we mean: The steps you need to execute to achieve a specific result.
- With REST, we mean: A web service that adheres to the RESTful principles.
- The application (client) pushes the data to eMagiz.
3. Configuration REST web service
The main idea of hosting a web service, whether it be SOAP/XML or REST/JSON (or any other combination), is that the process you are supporting wants to be informed in real-time or wants to execute actions in real-time without any support from the integration. In other words, you want the application to push the requests to eMagiz instead of eMagiz having to pull the data out of an application.
In this microlearning, we will focus on the REST web service and how you can host this in eMagiz through some simple steps. To summarize, hosting a REST web service gives you the following:
- A way to listen for messages instead of actively needing to pull them.
- A way to receive messages via various HTTP methods (GET, PUT, POST, DELETE, and others)
Before we delve into the steps required to configure a REST Webservice let us first turn our attention to the Best Practices when configuring a REST Webservice
3.1 Best practices
- Remember to fill in Capture and Design as you are used to. Those steps don't change if you want the output of what is being delivered on your REST endpoint transformed to a CDM and beyond
- Use naming conventions to make it clear to the calling party what the build-up of the endpoint is, which methods are allowed and which content types are allowed
- Keep the connectivity in the entry and the transformation in the onramp
- Use one HTTP Inbound Gateway per HTTP Operation (i.e. GET /order/{uuid} or POST /order)
3.2 Setting up Capture & Design
As with all solutions, we start our journey in Capture, and from there, we move through the various ILM phases of eMagiz.
In Capture, you need to, just as with other solutions, check whether the system already exists and, if not, create a new system.
Subsequently, you draw the lines and fill in the relevant information.
Subsequently, in the Design phase, you execute all regular steps as you are used to when creating a new system or a new integration.
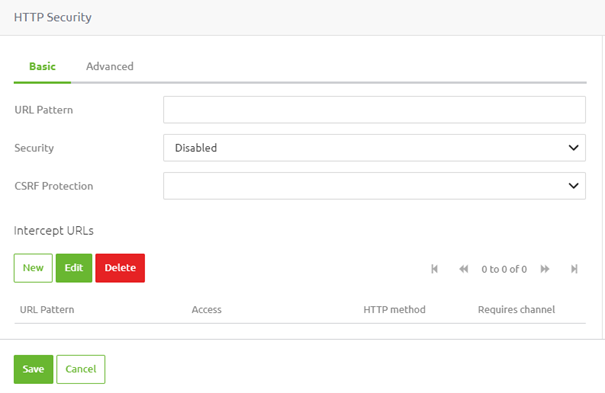
3.3 Setting the HTTP Security on infra level
The first part of the solution in Create is configuring the HTTP security. This is done in the infra flow. To ensure that the HTTP security in the new 3rd generation runtime works as before, you need to add a support object of the type "HTTP Security." In this "HTTP Security" support object, you only need to define "Disabled" in the Security drop-down.
When you have added this to the infra flow of the corresponding entry, you can create a new version and open the entry that you just added to Create. In this entry, you need to add an HTTP inbound gateway in which you define your endpoint. This is explained below.
3.4 Configuring an HTTP Inbound Gateway
Per operation that you want to expose, you need to have an HTTP Inbound Gateway as a starting point of your solution.
Ensure that you create two channels (one for the request and one for the response) within your solution.
You will need those channels as input and output of your HTTP Inbound Gateway.
The next step would be to open the HTTP Inbound Gateway and configure it accordingly.
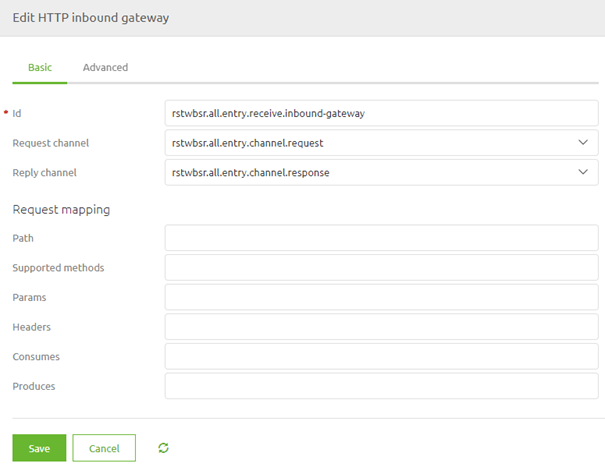
At least you need to add a path that will make the endpoint specific for a certain HTTP Operation and define the HTTP Operation (POST, GET, DELETE)
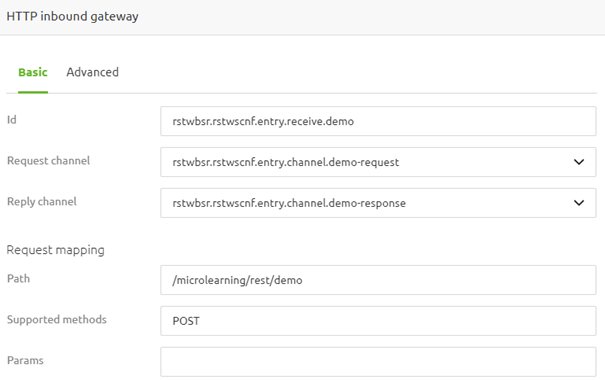
Furthermore, you can define settings such as required params or that your endpoint only consumes JSON, for example, to further limit the options given to clients calling the endpoint.
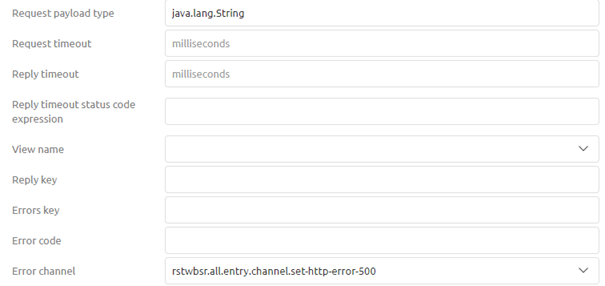
Apart from the settings on the Basic tab, you need to set a few things on the Advanced tab. One of these settings is the request payload type and the error channel.
For the request payload, you should enter the value java.lang.String and for Error channel, you should select the channel to which you want to route error messages.
Furthermore, when you use parameters (path or query), you can place them in the message headers with a simple SpEL expression:
- #pathVariables['{nameofpathparam}']
- #requestParams['{nameofqueryparam}']
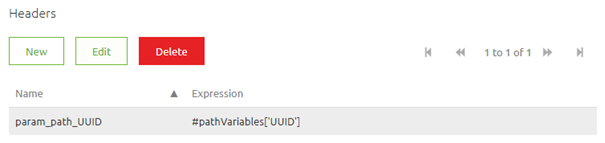
Based on the above configuration, the endpoint will now look as follows:
3.5 Error Handling
Returning a 401
In case you secure the web service with the help of an API key, you can validate whether what the client sends to the web service for authentication is indeed a correct ApiKey. This can be done via the following steps:
- Place a standard filter in your entry to validate if the ApiKey provided by the client is valid. This can be done via a SpEL expression comparable to the following SpEL expression headers['Authorization'] == '${authentication.inbound.api-key}'
- In cases where the client is not authorized, lead the message back to a standard header enricher. In this "standard header enricher," add a header called http_statusCode with a value of 401
- Add a standard transformer to set a default message that can be returned to the client. An example would be { "errors": [{ "internalMessage": "Unauthorized" }]}.
Returning a 403
If you have secured your REST web service with the help of a client certificate and the client cannot provide the correct certificate, eMagiz will return a 403 by default. No other changes in the flow are needed.
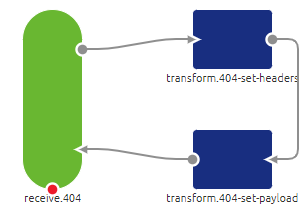
Returning a 404
eMagiz will give back a 404 by default if the endpoint is not configured in one of the HTTP inbound channel adapters in your flow. You can override this functionality via the following steps.
- Add a separate HTTP inbound channel adapter that resolves to /\* (this catches everything that any other HTTP inbound channel adapter cannot resolve)
- Set a standard header enricher and add a header called http_statusCode with a value of 404
- Add a standard transformer to set a default message that can be returned to the client. An example would be {"errors": [{"internal message": "Het aangeroepen endpoint is niet gevonden"}]}.
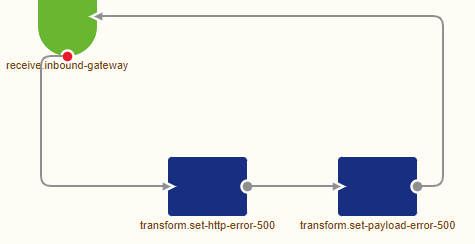
Returning a 500
eMagiz will give back a 500 by default if the flow results in an unresolvable error. To counteract this, for most scenarios, the error handling in eMagiz for synchronous flows has changed so that the message or error will be returned to the client. To specify the HTTP code and body of the response, you can follow these steps.
- Use the standard filter eMagiz gives you in a synchronous flow (with the SpEL expression headers['emagiz_error_isErrorMessage']!=true) and make sure that instead of throwing a default error the error channel leads to a standard header enricher
- Set a standard header enricher and add a header called http_statusCode with a value of 500
- Add a standard transformer to set a default message that can be returned to the client. An example would be { "errors": [{ "internalMessage": "Een technische error heeft plaatsgevonden in de integratie" }]}.
3.6 Define the Runtime Settings
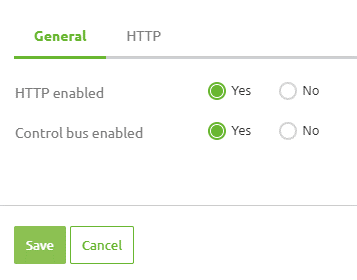
After configuring everything in Create, you must define the runtime settings under Deploy -> Architecture. This new functionality allows you to specify the port on which the REST web service needs to be running (and optionally SSL settings when running it on-premise). You can access these settings via the context menu on the runtime level.
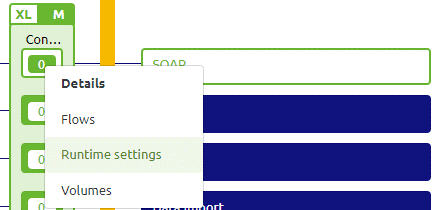
Once you have selected this option, a pop-up will appear, showing you, among others, the HTTP settings. The HTTP enabled option needs to be enabled for a REST web service, and when we look at the advanced tab, we need a reference to the port we will use here (which can be a property reference).

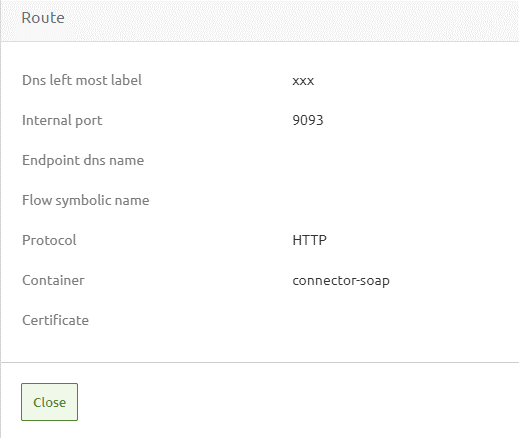
3.6 Check your route settings
For cloud-hosted endpoints, you are already used to defining a route configuration for your endpoints.
With the 3rd generation runtime, you must also do this for your on-premise hosted endpoints. When configuring the route, you need to take the following into account:
- The port configured under the route must match the port defined under the Runtime settings configuration
- The DNS left-most label has no effect and can be filled with anything
- Make sure to link the correct container to your route
4. Key takeaways
- A REST web service allows the application (client) to push data to eMagiz in real-time, reducing the need for the platform to pull data actively.
- Hosting a REST web service provides flexibility in receiving messages via different HTTP methods, such as GET, POST, PUT, DELETE, and more.
- Ensure that you follow best practices like maintaining clear endpoint naming conventions and handling security configurations effectively.
- Proper error handling modeling is essential, with specific strategies for managing different HTTP status codes, including 401 (Unauthorized), 403 (Forbidden), 404 (Not Found), and 500 (Internal Server Error).
5. Suggested Additional Readings
If you are interested in this topic and want more information, please read the help text provided by eMagiz and read the following links: