Customize Queue Alerting

Last modified by Danniar Firdausy on 2024/09/04 15:45

In this microlearning, we’ll explore how to customize queue alerts within your eMagiz environment. Customizing these alerts allows you to tailor the trigger conditions and thresholds to better fit your specific needs, enhancing how you monitor and respond to queue activity. We’ll cover the four types of queue triggers available and guide you through configuring them to suit your requirements. This will help you ensure your alerts are as effective and relevant as possible. Should you want to learn more about the standard alerting that eMagiz offers or the general concept of eMagiz Queue Alerting, please check out this microlearning.

Should you have any questions, please contact academy@emagiz.com.

Information

Note that this documentation explains the latest design of eMagiz Queue Alerting that is introduced in Release 226 and the Queue Alerting explained in this page is only applicable for eMagiz models that are running the current generation architecture

1. Prerequisites

  • Basic knowledge of the eMagiz platform
  • Basic knowledge of alerting in the eMagiz platform

2. Key concepts

This microlearning focuses on customizing the queue alerts that are existing in each of the environment of your model (i.e., Testing-Acceptance-Production). By customizing we mean further configuring the trigger conditions and thresholds of your queues from the general default settings provided by eMagiz, so they better suit your needs and requirements.

  • eMagiz applies the same set of triggers to all queues.
  • There are four queue trigger options that eMagiz currently provides:
    • Consumers check
    • Queue load check
    • Inactivity check
    • Periodic activity check
  • Recipients are defined on the queue level.

3. Queue Alerting

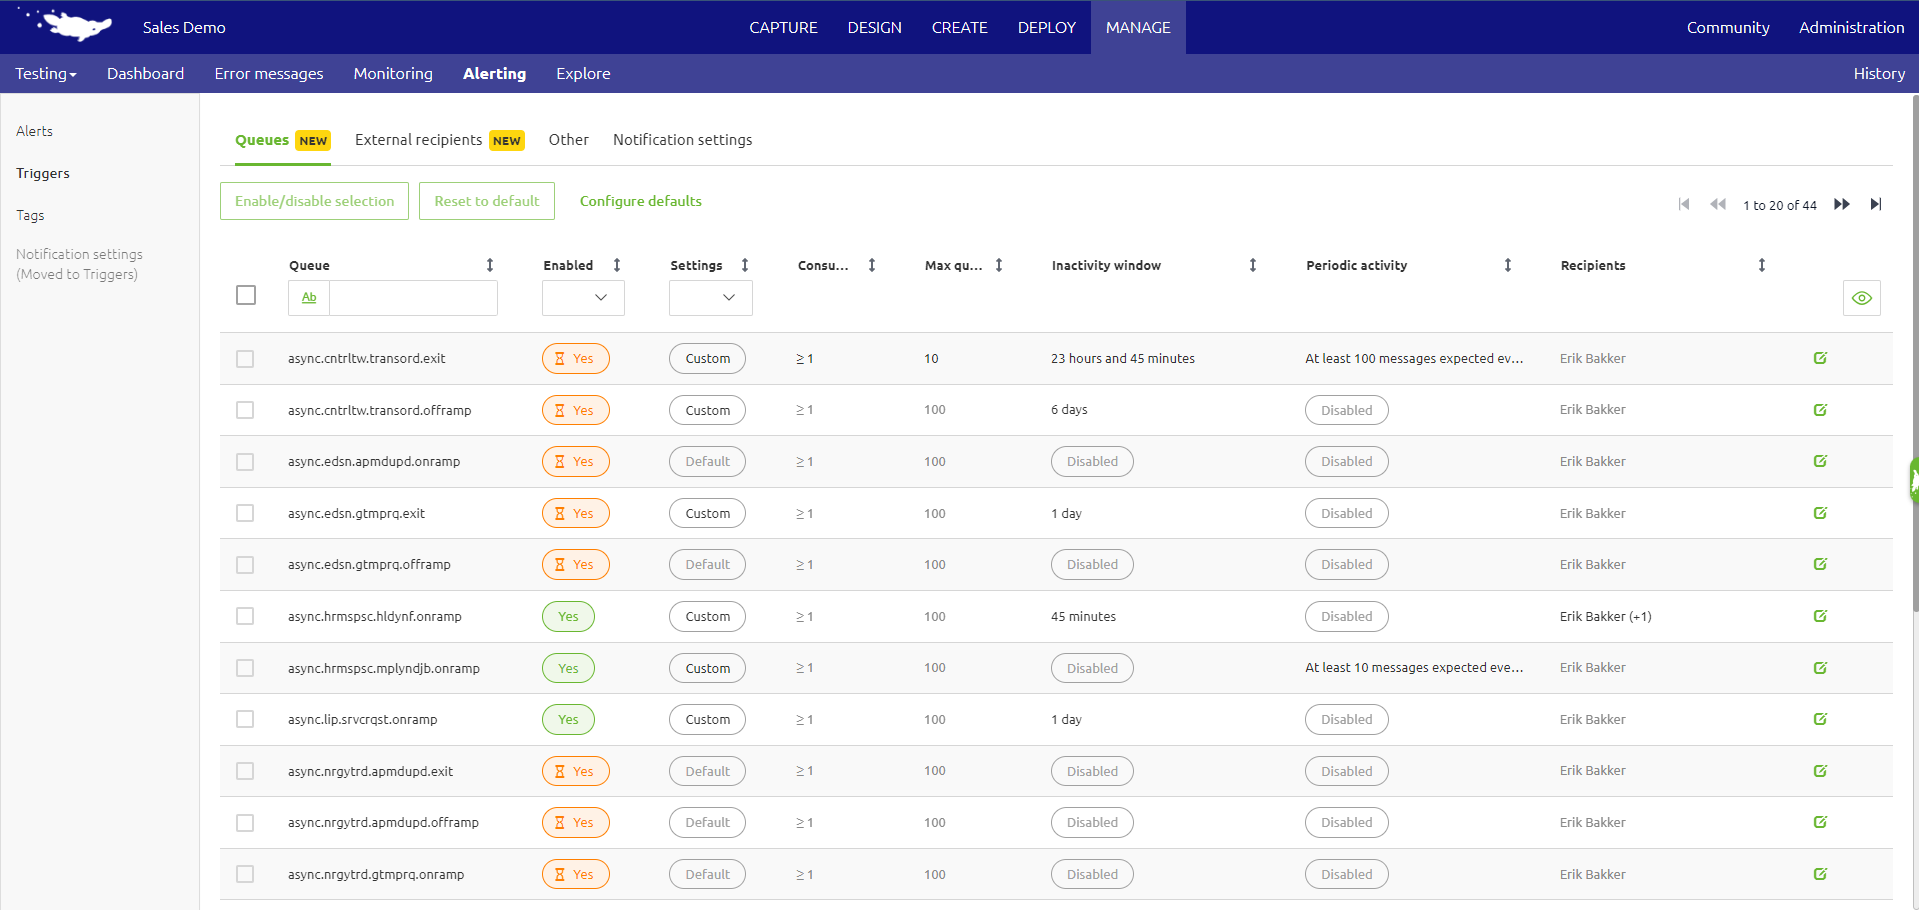
As discussed in the previous microlearning, queue alerting refers to the configuration of alerts that work by applying a uniform set of triggers to all queues in your model.
crashcourse-platform-manage-alerting-in-emagiz-queue-alerts-overview.png

Here, when you navigate to Manage->Alerting->Triggers, you will find all the queues that are generated by eMagiz currently existing within your model, along with the trigger conditions and thresholds that are applied to each of these queues. In the following sections, we will discuss how you can tune these queue triggers to your needs.

3.1 Customize Default Values

Changes to the default values will only apply to queue triggers that are set to use the default values, and not to those you have already customized. To modify the default values configured by eMagiz, you can click the "Configure defaults" button at the top of the queue trigger list. Note that if your account does not have edit rights in Manage for a specific environment, you will see a "View defaults" button instead.
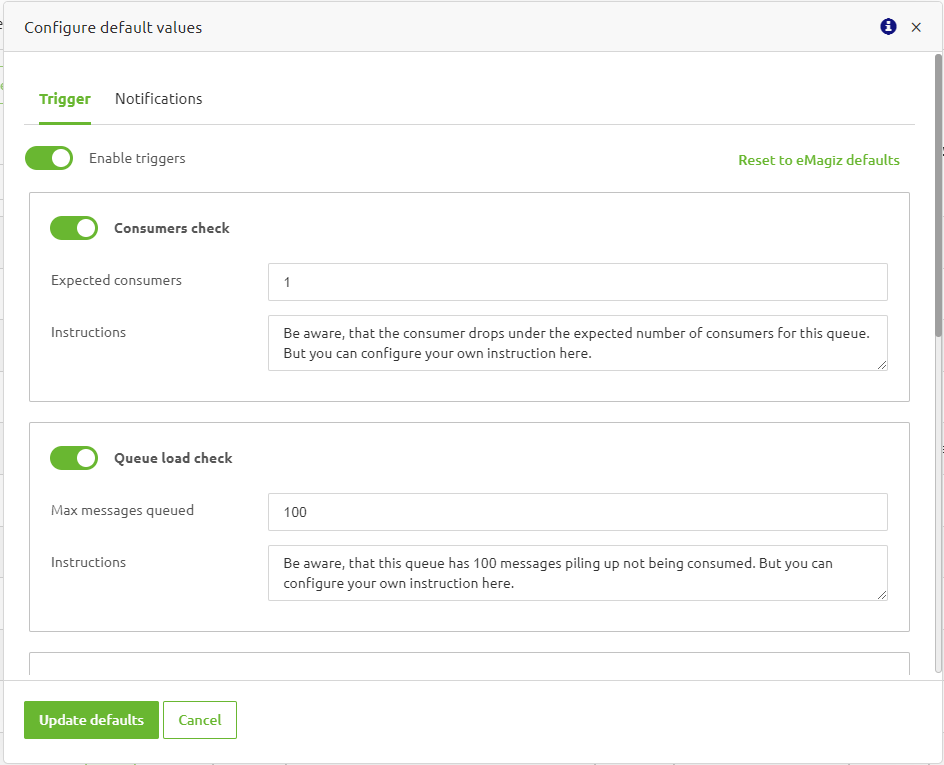
novice-alerting-customize-queue-alerting-consumers-check-queue-load-check.png

Here, you will get a pop-up page where you can configure the default values of your queue triggers. The details of each of the triggers will be discussed in the next section. But, what is important to note here is that, here, you have the "Reset to eMagiz defaults" button to reset the default values to the values provided by eMagiz as defaults. Next to that, at the end of the page, you will find the "Update defaults" button, which will apply the default values that you have configured to all queue triggers that are set to use the default values. By clicking this button, the new default values will be put into effect immediately. 

Additionally, on this page, you can also find the "Notifications" tab that allows you to configure which recipients that you want to receive the notifications from the alerting. If you want to learn more about this notifications and how to configure it, please refer to this microlearning.

3.2 Customize Queue Alerting

Next to customizing the default values for each queue triggers, you can also modify the trigger configurations for individual queues. To customize these queue triggers to better suit your needs, you can click the edit buttons (green paper and pencil buttons) located at the end of each queue trigger. By doing so, you will get a pop-up page that allows you to further customize the conditions and thresholds of your queue triggers, which will be discussed in the following.

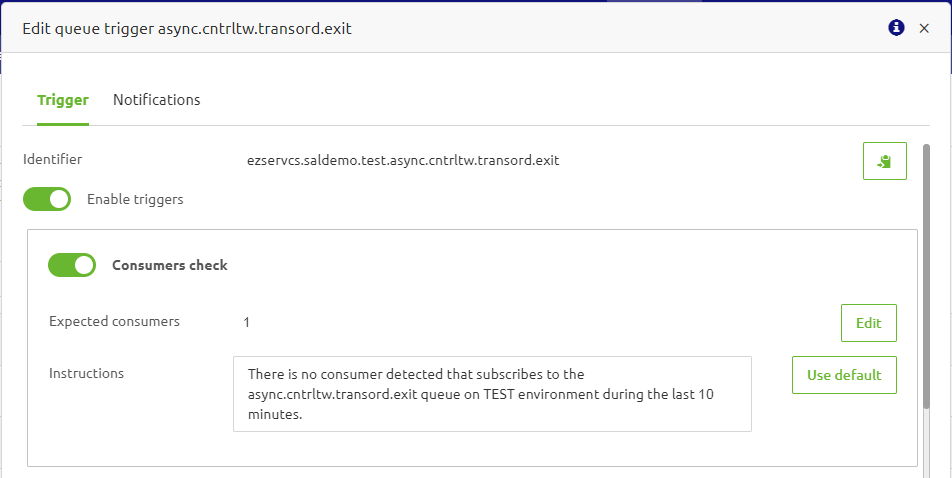
  • Consumers check  
    novice-alerting-customize-queue-alerting-consumers-check-queue.png
Information

This trigger checks how many processes (consumers) are subscribing to and retrieving messages from a particular queue over the last ten minutes. It evaluates whether the number of consumers meets the specified threshold. If the number of consumers falls consistently below the "Expected consumers" value for a period of ten minutes, an alert is generated. You can customize this threshold as needed. Additionally, you can specify the instructions to be included in email notifications sent to recipients and in the alert message displayed in the Manage->Alerting->Alerts.

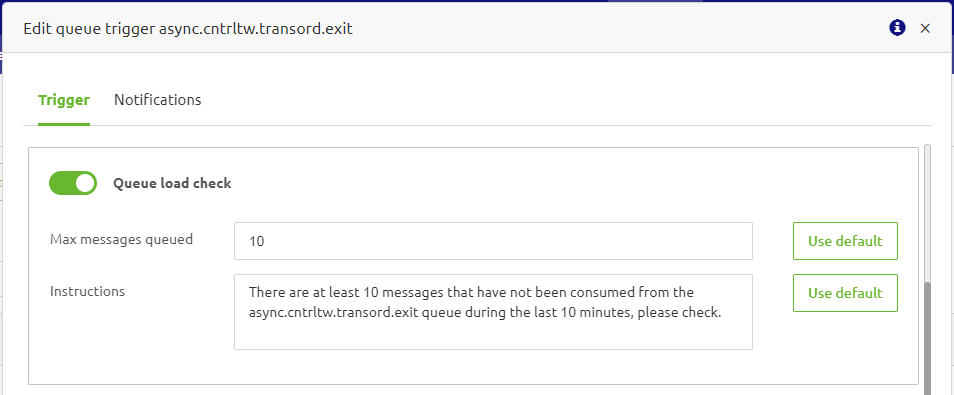
  • Queue load check
    novice-alerting-customize-queue-alerting-queue-load-check.png
Information

This trigger checks how many messages are produced on a particular queue and not yet retrieved by any consumers over the last ten minutes. It measures the number of messages on the queue. If the number of messages is consistently greater than the threshold value (i.e., "Max messages queued") for a period of ten minutes, an alert is generated. Otherwise, no alert will be generated. You can customize this threshold as needed. Additionally, you can specify the instructions to be included in email notifications sent to recipients and in the alert message displayed in the Manage->Alerting->Alerts. It is important to note that if high bursts of messages occur regularly (e.g., during nightly batch processing, 1000 messages are expected to be produced to a certain queue), then setting a higher threshold (e.g., 1000 Max messages queued) can prevent false-positive alerts caused by the default configuration.

  • Inactivity check
    novice-alerting-customize-queue-alerting-inactivity-check.png
Information

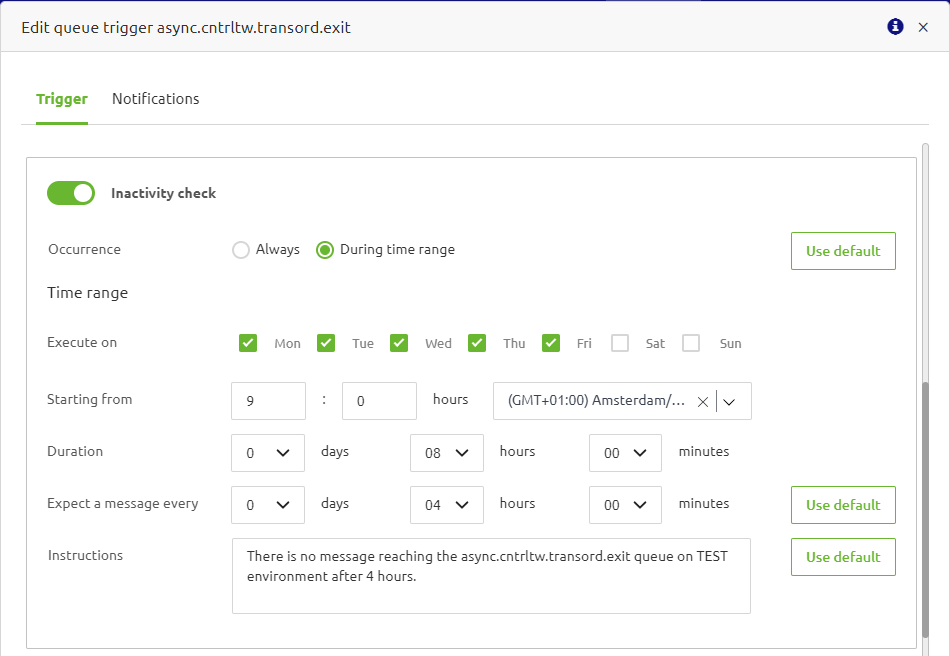
This trigger checks whether a particular queue receives at least one message regularly or within the specified time frame. With this trigger, you specify whether you want to 'always' have the check running everyday or only during a specified time range. If the queue receives a message within a specified time frame (i.e., time frame specified in the 'Expect a message every'), then the timer will reset and the next evaluation interval will start. Therefore, this trigger can produce two or more alerts a day if that setting is set to less than half a day. Similar to the other triggers, you can specify the instructions to be included in email notifications sent to recipients and in the alert message displayed in the Manage->Alerting->Alerts.

  • If you select the "Always" option, the next step is to configure the "Expect a message every" period. This is useful if you want to run the check every day and be notified when your queue has not received at least one message within a specified time frame, such as within an hour, a day or more.
  • If you select the "During time range" option, you can specify the days of the week and the starting time for the trigger to evaluate the queue. You will also need to specify the duration for which the trigger will evaluate and how frequently within that duration the queue should expect at least one message. Note that for this option, the "Expect a message every" setting must allow for at least two occurrences within the specified duration.
  • In the example above, the trigger is set to evaluate from Monday to Friday, 9:00 to 17:00, and expects a message every four hours, an alert will be sent if no message is received by 13:00. However, if a message is received at 11:00, then the timer resets, and the next check will be at 15:00. If no message is received by then, an alert will be sent. Consequently, due to the configuration of expects a message every four hours, and considering that there are only two hours left until the configured 17:00, the trigger for the remaining two hours will not be executed.
  • Periodic activity check
     novice-alerting-customize-queue-alerting-periodic-activity-check.png
Information

This trigger checks whether at least the specified number of messages is received during the specified interval. Similar to the others, you can also specify the instructions to be included in email notifications sent to recipients and in the alert message displayed in Manage->Alerting->Alerts. 

  • If you enable this trigger, you must also specify the days of the week, the starting time, and the duration for the trigger to evaluate the queue. Additionally, you need to specify the minimum number of messages the queue is expected to receive. If this number is not reached, an alert will be generated.
  • Unlike the Inactivity check, this Periodic Activity check evaluates only at the end of each interval and does not reset the timer when the minimum number of messages is reached during the interval. This means that this trigger will not produce more than one alert per day. 
  • In the example above, the trigger is set to evaluate from Monday to Friday, from 9:00 to 8:45 in the following morning, and expects a minimum of 100 messages within each interval. If the 100 messages are not received by that 8:45 in the next morning, an alert will be sent. Alternatively, if the 100 messages are reached, no alert will be generated for that interval, and the next check will start again at 9:00. For intervals starting on Friday, the next check will begin at 9:00 AM on Monday, as Saturday and Sunday are not included.

Upon saving, these custom values will apply immediately, putting the new check into effect. Additionally, you will notice that the "Settings" status of the queue trigger you just customized has changed from "Default" to "Custom". Similarly, on this page, you can also find the "Notifications" tab that allows you to configure which recipients that you want to receive the notifications from the alerting of a specific queue. If you want to learn more about this notifications and how to configure it, please refer to this microlearning.

4. Key takeaways

  • As a user with the edit rights in Manage of a particular environment, you can modify the default values for all of your queue triggers or customize the trigger configurations of individual queues. 
  • eMagiz provides four queue trigger options: Consumers Check (monitoring the number of processes consuming messages), Queue Load Check (monitoring the number of queued messages), Inactivity Check (ensuring regular received message), and Periodic Activity Check (ensuring a minimum number of messages within a specified interval).
  • Once you save your trigger configurations, they will take effect immediately.

5. Suggested Additional Readings

If you are interested in this topic and want more information, please read the help text provided by eMagiz and read the following microlearning.