
Configure Roles and Users
In this microlearning, we will focus on learning how you can configure roles and users for the API Gateway in eMagiz. We will walk through the essential steps to set up your API Gateway by defining which clients have access to which operations. This process involves setting roles and users to ensure proper access control.
If you have any questions along the way, feel free to reach out to us at academy@emagiz.com.
1. Prerequisites
- Basic knowledge of the eMagiz platform
2. Key concepts
This microlearning centers around configuring roles and users for the API Gateway solution of eMagiz.
- With roles, we mean: Any action that is available to be executed on an internal system that you want to make publicly available via the API Gateway
- With users, we mean: Any system or user that is granted access to such actions via the role
- With API Gateway, we mean: A collection of RESTful API operations that can be published to the outside world to give them access to applications that are linked to your business process
3. Configure roles and users
A crucial part of setting up your API Gateway with the help of RESTful services is defining which client has access to which operation. In eMagiz, you have a straightforward way to define "consuming" entities of an API Gateway and assign the correct roles and rights on the role and user level. This is done in a two-part process. The first part is done in Capture and Design, which we have covered in the previous microlearnings. The second part is done in Deploy, which will be discussed in this microlearning.
Below we will discuss each of these parts in more detail.
3.1 Capture
In Capture, you can add a so-called 'consuming' system of an API Gateway.
To define a 'consuming' system, you need to draw a line from the system to eMagiz, indicating that an external system is 'consuming' the API Gateway.
The type of system you choose does not matter. Both single-tenant and multi-tenant systems can fulfill these purposes.
The choice between creating a standard or multi-tenant system is based on what you want to achieve in terms of giving access to roles and users.
By choosing the standard system, you make the implicit choice that one user (i.e., that system) has one specific role.
By choosing the multi-tenant system, you state that multiple users have the same role.
If you choose a multi-tenant system, make sure also to define the tenants before you continue.
If you already have a system that also wants to 'consume' an API Gateway, you don't have to create a new system but can draw a line from the existing system towards eMagiz.
A possible solution of two separate 'consuming' systems of the same resource can be represented as follows.
3.2 Design
When you add a "consuming" system of type API Gateway in Capture, you have the ability in Design to assign rights to that "consuming" system on one or more operations.
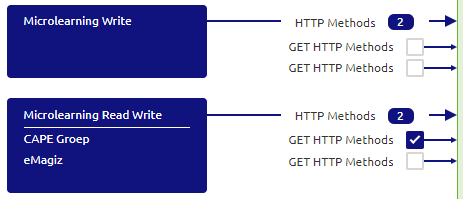
This can be done by activating the checkbox in Design.
By activating the checkbox in Design, you're telling eMagiz that this particular system (and all underlying users) has the right to access the operation you have just selected.
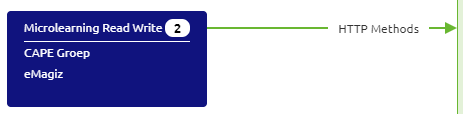
In the example below, it means that the 'consuming' system (i.e., the role) Microlearning Read Write has access to the GET HTTP Methods operation
whereas the 'consuming' system (i.e., the role) Microlearning Write has no access to the GET HTTP Methods operation
3.3 Deploy
Changes made in Design are automatically updated in Deploy for the Test environment when you navigate to the User management tab, given that the operation is already available in a Release. This means that when you open the User management tab, you will see all users and roles in the correct configuration based on the checkboxes selected in Design.
To synchronize the Deploy phase of User Management with your configuration in Design for Acceptance and Production, you must first press the "Transfer from Design" on the role level and subsequently on the user level.
3.3.1 Test the API as portal user
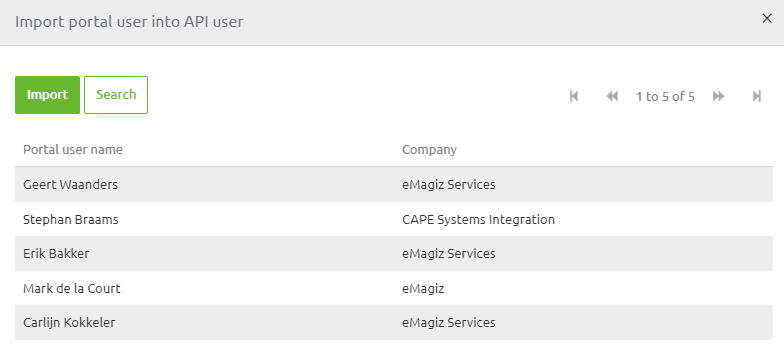
Suppose you want to test the API operations yourself without breaking the barrier between tests executed by external parties and developers. In that case, you can create an API user based on your portal user. This can be done via the Import button in the User management tab.
This method ensures that you do not mix the authentication and authorization of your test with tests from an external system.
After you have pressed the import button, you can select which user you want to create a User. Here you can choose only those users that have access to this project.
After you have created the user, you can assign roles. For example, to Assign a role, you select the freshly imported user and open the tab called Assign Roles.

Based on your needs, you can give the portal user all roles or assign a subset of the roles to the portal user.
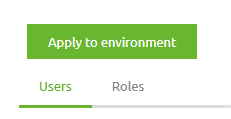
After you have verified the settings and are satisfied with how the rights per role and user are configured, you can update
these settings per environment by pressing the Apply to environment button.
By pressing this button, you indicate that your design choices can be actualized in Deploy for that particular environment.
3.3.2 Apply to environment
After you have verified the settings and are satisfied with how the rights per role and user are configured, you can update these settings per environment by pressing the Apply to environment button. By pressing this button, you indicate that your design choices can be actualized in Deploy for that particular environment.
3.3.3 Actualize "User Management"
Read the pop-up you get after pressing this button carefully as it says what your next move is. This next move differs between the Legacy runtime and the 3rd runtime generation.
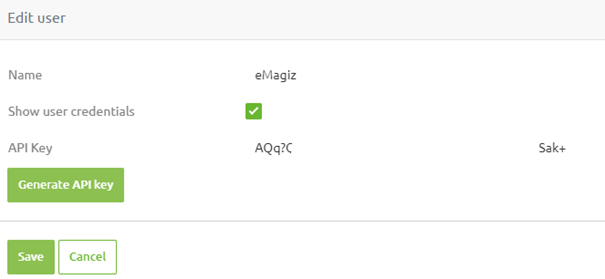
3.3.4 Communicate Credentials
After you have pressed the Apply to environment button, you can retrieve the relevant authentication information per user by "editing" the user in user management and activating the checkbox "Show user credentials."
4. Key takeaways
- In eMagiz, you have a straightforward way to define "consuming" entities of an API Gateway and assign the correct roles and rights on the role and user level. This is done in a two-part process.
- The first part is done in Capture and Design. The second part is done in Deploy
- A 'consuming' system equals a role
- A 'consuming' tenant or system equals a user
5. Suggested Additional Readings
If you are interested in this topic and want more information, please read the help text provided by eMagiz and the following link.