API Gateway Security - External IDP
In this microlearning, we’ll explore how to integrate an external identity provider (IDP) with your API Gateway in eMagiz to manage user authorization. We’ll cover the necessary configurations, including how to input the Token and Issuer URL from your external IDP, and how to manually set up and maintain users and roles in eMagiz to stay in sync with your IDP. This guide will walk you through the steps required in both the Design and Deploy phases to ensure seamless integration and proper security setup. Let’s dive into the details of making this integration work.
Should you have any questions, please get in touch with academy@emagiz.com.
1. Prerequisites
- Expert knowledge of the eMagiz platform
2. Key concepts
This microlearning focuses on using an external IDP to validate whether a user is authorized to execute a certain action on your API Gateway and what configuration is needed in eMagiz to make this work.
- The Token and Issuer URL of the external IDP need to be known
- Users and Roles under User Management need to be manually configured and maintained to keep them in sync with the external IDP
3. External IDP
In the crash course on the API Gateway we discussed the various options available to secure your API Gateway properly. In this microlearning, we will expand our knowledge on that topic by looking at a special case of securing your API Gateway. That case is special as you use an external identity provider (IDP) to govern the roles and users that have rights on your API Gateway.
When selecting the option OAuth2.0 (or OpenID Connect) you have the option to use the IDP provided by eMagiz which makes the configuration easy or you could use an external IDP which you have control over and want to use for this purposes.
In this microlearning we will highlight what you need to configure in Design and Deploy to make this work within the tooling of eMagiz.
3.1 Design
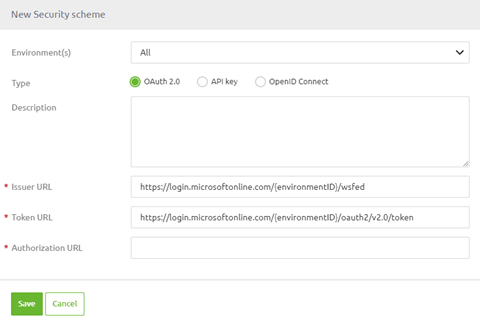
On the security level of the API Gateway in Design you need to select the desired option, for example OAuth2.0. Instead of not filling in the token and issuer URL, indicating that you want to use the eMagiz IDP, you need to fill these in to reference the IDP of your choice. Below you see an example of how this could be configured.

Note that the environmentID in this example should be replaced with an actual environmentID that references your environment.
3.2 Deploy
Normally, eMagiz will automatically update the User Management information based on the configuration in Design. However, because the identity check is not done by eMagiz but by an external party you need to manually enter the roles and users and configure the scope correctly on role level.
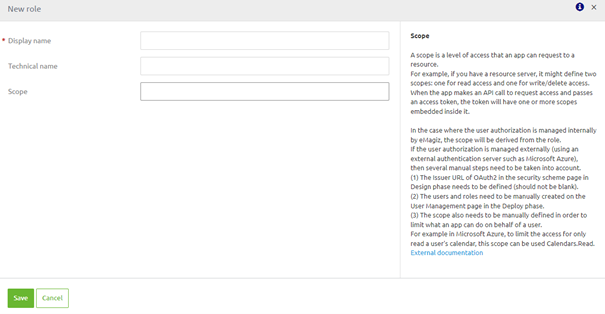
To do so navigate to User Management in Deploy and add the users you want manually by pressing the New button and providing them with a name. Do subsequently the same for the roles. On role level do not forget to correctly enter the scope to make the call work. Note that the help text on the scope level gently reminds you what you need to do to make this work.

4. Key takeaways
- The Token and Issuer URL of the external IDP need to be known
- Users and Roles under User Management need to be manually configured and maintained to keep them in sync with the external IDP
- When implementing this you would be the first to do so with this setup.
