
API Security
In this microlearning, we will explore how to secure the front-end of your API Gateway. You will learn how clients can authenticate themselves when accessing APIs and which authentication methods eMagiz provides. In the next microlearning, we will build on this foundation by exploring how to manage your users and their permissions.
If you have any questions along the way, feel free to reach out to us at academy@emagiz.com.
1. Prerequisites
- Basic knowledge of the eMagiz platform
2. Key concepts
This microlearning centers around authentication methods for your API Gateway.
- Authentication method: The method used to verify the identity of a client attempting to access an API.
- API Gateway: A collection of REST API operations that can be exposed externally to provide controlled access to applications and business processes.
3. API Security
Before a client can access an API operation, the API Gateway must verify the client's identity. This process is known as authentication.
Authentication ensures that only trusted clients can communicate with your APIs. eMagiz supports three authentication methods that allow clients to prove their identity before access is granted:
- OAuth 2.0
- Basic Auth
- API Key
All three methods can be supplemented with the requirement that a client needs to send along a client certificate when executing the call. This can only be added to all methods and operations at once.
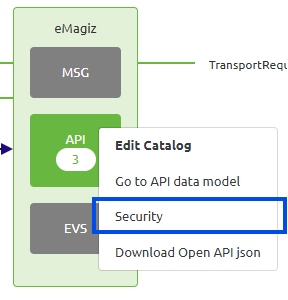
To choose the authentication methods for your API Gateway you can navigate to Design and open the context menu on API level. There you find the option to open the API security page.
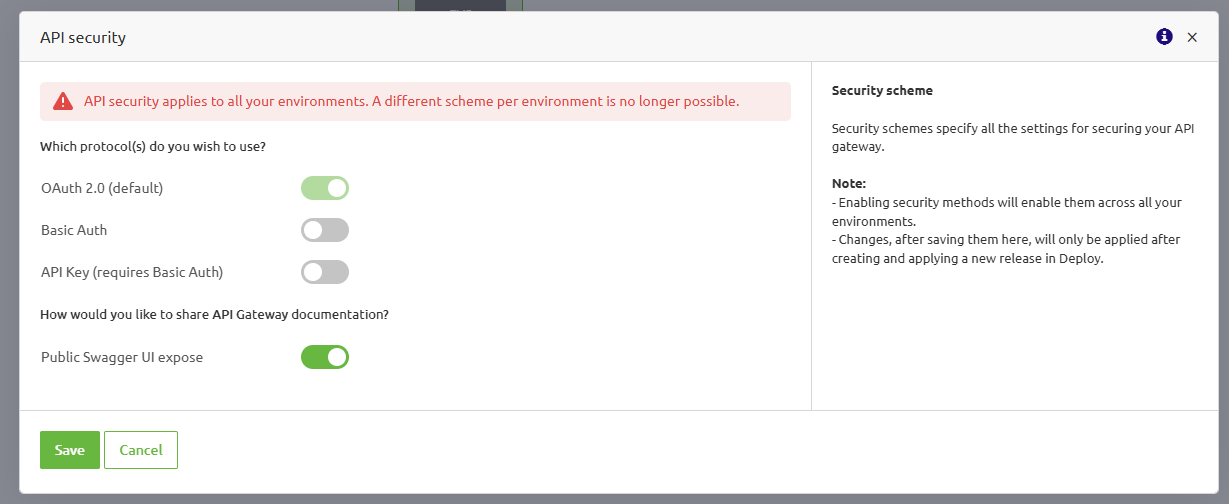
You can choose to activate multiple methods across your model. Later in Deploy - User Management, you can specify per user which authentication methods they can use.
Whenever you change the security of your API Gateway here, you have to deploy a new release in the Deploy phase to make the changes available in User Management.
For each of the authentication methods, the API Gateway will know how to evaluate if the user has provided the correct credentials to execute the request. Otherwise, standard HTTP status codes will be sent back depending on the issue that occurred.
Below, each of the three authentication methods will be explained.
3.1 OAuth 2.0
OAuth 2.0 uses a customer-specific authorization server provided by eMagiz. The authorization server knows which access rights the system has and can translate this into a token. Before making a call to the API Gateway, systems need to get this token from the authorization server. If your external system supports OAuth 2.0, this is a very secure method that requires little to no setup effort.
eMagiz supports two grant types: Client credentials and authorization code. By default, client credentials are used, which ensures systems can communicate with each other without needing human intervention. If required, the Authorization code grant type can be enabled in the Deploy phase for specific users.
eMagiz does not support using your own authorization server (e.g. Azure AD).
3.2 Basic Auth
When enabling Basic authentication, systems will send the actual username/password credentials (encoded) with each request in the Authorization header.
The credentials will be generated for you by eMagiz.
3.3 API Key
API Key authentication works similarly to Basic Auth but instead of the full username/password a seemingly random API key is sent by systems in a custom header.
eMagiz will generate this API key for you since it does contain some (encrypted) information on the user and their permissions.
The required header name is x-api-key (case sensitive). This cannot be deviated from.
This is the simplest method available in terms of authentication. Therefore, this method is frequently used in situations that demand low technical complexity and deal with less sensitive data.
4. Key takeaways
- eMagiz offers three authentication methods for securing your API Gateway:
- OAuth 2.0: A flexible option that can be tailored to use different grant types, including Client Credentials and Authorization Code. The most secure option.
- Basic Auth: A basic form of authentication using username/password credentials.
- API Key: An even more basic form of authentication using a unique key.
- In the next microlearning, we will explore how to manage your users and their permissions to further secure your API Gateway.
5. Suggested Additional Readings
If you are interested in this topic and want more information on it please read the help text provided by eMagiz and the following link.