
Setting up exit gate
In this microlearning, we will walk you through how to configure the exit gate, which ensures seamless message delivery between the API Gateway and your backend operations. We will cover the essential parts from basic concepts to practical steps, so you will know exactly how to configure an exit gate to deliver incoming requests and give back responses to the client calling the API.
If you have any questions along the way, feel free to reach out to us at academy@emagiz.com.
1. Prerequisites
- Basic knowledge of the eMagiz platform
2. Key concepts
This microlearning centers around setting up the exit gate for the API Gateway solution of eMagiz.
- With exit gate, we mean: The piece of functionality that connects to the backend operation to execute the action on behalf of the client that is calling the API
- With API Gateway we mean: A collection of RESTful API operations that can be published to the outside world to give them access to applications that are linked to your business process
The exit gate is created by eMagiz based on the configuration in Design. In passthrough cases, you only need to add authentication.
In cases of transformation, you need to specify the outbound component (e.g., HTTP, Web service, JDBC, SFTP, etc.) and the authentication.
3. Setting up exit gate
Each backend operation has a specific exit gate that will handle all incoming traffic, connect to the backend operation and send the response back to the client that is calling the API.
The exit gate can process up to five calls at the same time. The moment the response is delivered to client 1, the exit gate will continue with the message of client 6.
With this setting, we already scale the API Gateway in such a way that it can handle concurrency and peaks in traffic. For most use cases these settings will suffice.
eMagiz will generate almost everything for you when you transfer an API integration to Create.
There are however some things you need to change depending on the choices made in Design and based on the required authentication method.
In case you have a passthrough case and the authentication method can be handled via a REST template (i.e. basic, OAuth, azure) you only need to configure this specific authentication mechanism.
In case you have a passthrough case and the authentication cannot be handled via a REST template you need to set up the authentication yourself.
In case you have a transformation case you need to configure the outbound component + the accompanying authentication.
In the most standard case, eMagiz will auto-generate the following flow for you
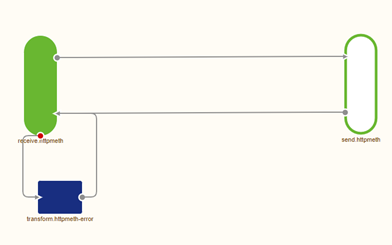
Just as with the entry gate we try to auto-generate as much as possible to make your life easier the moment you start in the Create phase.
4. Key takeaways
- Each backend operation has a specific exit gate that:
- Handles all incoming traffic destined for that backend operation
- Connects to the backend operation to execute the requested action
- Sends response back to the client that made the API call
- eMagiz will automatically handle most of the setup for you, including the generation of the exit gate configuration.
- Depending on your use cases, some manual changes might be necessary
5. Suggested Additional Readings
If you are interested in this topic and want more information on it please read the help text provided by eMagiz and read the following link: