eMagiz Runtime Generation 3
Below is a document describing the migration path to migrate a single runtime (i.e., connector or container) to the latest generation runtime. For the key aspects of the new generation compared to the current generation, please read this fundamental.
Should you have any questions, please get in touch with academy@emagiz.com.
1. Prerequisites
- Advanced knowledge of the eMagiz platform
- A thorough understanding of your eMagiz model
2. Key concepts
- This migration path allows you to migrate a specific runtime to Generation 3
- All flows of the runtime are updated, so plan your migration
- The JMS needs to be migrated to Generation 3 as the last runtime of your model
- When executing the first migration of a runtime, additional steps are necessary to update your cloud configuration
- In case you want to use the new EDI functionality in messaging, both the connector and the process container need to be migrated to Generation 3
3. Migration Scenarios
As migrating to the latest generation runtime impacts your model, it is advisable to consider various scenarios. In broad terms, there are two scenarios with which you can migrate. The first scenario is a scenario we will call "Big Bang." In this scenario, you will migrate your complete model at once. The second scenario we will discuss is called "Gradual Improvement." In this scenario, you will migrate parts of your model in a larger time frame.
Before diving into both scenarios and outlining the pros and cons, let us first look at the current limitations of the new generation runtime that might impact your choice regarding which method to choose.
3.1 "Big Bang"
As the scenario's name suggests, this scenario is designed to migrate your complete model simultaneously. As a result, you can (quickly) execute the steps outlined in Chapter Four in one go.
3.1.1 Advantages
- You can execute the migration path efficiently as you migrate all runtimes in one iteration
- Your user experience won't be clouded by the fact that part of your solution runs the 'old' architecture and the other part runs in the 'new' architecture
- The duration of the complete migration path from start to finish is limited as you migrate everything at once, and therefore you can move through the environments at a faster pace
3.1.2 Disadvantages
- As you migrate everything at once, you need roughly 2-3 weeks in which no functional changes can happen on your model
- Everything needs to be tested at once
- If part of your model cannot yet be migrated, you need to wait until the complete model can be migrated before executing this scenario barring you from unlocking other new features only available on the new runtime architecture.
3.2 "Gradual Improvement"
As the scenario's name suggests, this scenario is designed to migrate your model gradually. As a result, you can (efficiently) execute the steps outlined in Chapter Four in a phased manner.
3.2.1 Advantages
- By migrating gradually, you can migrate parts of your model earlier, unlocking new features of the runtime architecture but keeping others in the current runtime until functional changes are done, or limitations are removed.
- You can incrementally test only those static parts of your solution that you want to migrate.
- Only the part you want to migrate cannot contain functional changes.
3.2.2 Disadvantages
- You need to migrate parts of your model over a more considerable amount of time (i.e., 2-3 months), meaning that you continuously need to be aware of how to migrate from the old to the new situation.
- When you run on both architectures, your user experience will be dual, especially in Manage. This means that part of your metrics, logging, and error messages are shown differently per runtime.
- By dragging out the migration over a long period, you risk that the migration takes such a long time that you are forced to migrate in a hurry at some point in time
- By dragging out the migration over a long period, you risk that unexpected behavior occurs in the non-migrated environment when applying changes to your architecture in Deploy.
- You continuously need to be aware of the order via which you need to migrate (especially surrounding the JMS migration).
4. Technical Migration Path
4.1 Preparation
Before we dive into the specifics of the actual migration and which steps to take once ready, it is good to start our journey toward the next-generation architecture with a preparation step. In this part of the migration path, we will highlight things you can consider and check before migrating your model to the next-generation architecture.
4.1.1 Getting context
With the next-generation architecture, various things will change in how eMagiz works on a technical level. On top of that, this changed way of working and thinking from the perspective of the product will have consequences for how certain interactions with the platform will function moving forward. Therefore, a good starting point is getting context on the next-generation architecture and how to interact with it. Some places to start are:
- Key aspects
- eMagiz runtime management
- Property management
- Runtime statistics
- Custom error handling
- SOAP web service migration
- REST web service migration
- Install eMagiz runtime on-premise Linux
- Install eMagiz runtime on-premise Windows
4.1.2 Things to prepare outside of eMagiz
Two parts of your integration model need work that needs to happen outside of the confines of the platform. In both cases, additional preparation is advised to make the whole process of migrating to the next-generation architecture.
The first part is the eMagiz Mendix Connector that some of you use to connect your Mendix systems to the eMagiz model. In such cases, you must know that only the Mendix connector versions above 6.0.0 support the next-generation architecture. It is also good to know that these versions still support communication towards the current-generation architecture, making them ideal candidates to be migrated in advance and only update the flows when executing the migration to the next-generation architecture.
In cases where your app is already running version 5.0.0 or higher, the migration path is straightforward and consists of correctly updating the eMagiz Mendix Connector. How to do so can be found here. Should you still run a lower version than 5.0.0, we have some migration paths available for you to migrate your eMagiz Mendix Connector correctly. These can be found here.
The second part is when you run any part of your eMagiz model on-premise. In these instances, you must stop and correctly turn off (and later remove) your current on-premise runtimes when you migrate your solution to the next-generation architecture. Avoiding to do so can lead to unexpected behavior. On top of that, it is critical to know that when running on-premise, you need to have a server on which Docker can be run so that it can execute our Linux images. For more information on correctly configuring your server for this, please check out this microlearning
4.1.3 Things to check
Apart from getting context and ensuring that the larger surroundings are ready for the actual migration to the next-generation architecture, you can already perform a pre-check on your model before starting the migration. Below is a list of things you can already validate before migrating:
- Validate whether flows within the context of a container (i.e., runtime) all have a unique ID. In case this is a problem you will be notified of this while migrating. Several known instances in which this occurs are:
- Data pipelines
- Specific "old" store content. This is store content that is not available on eMagiz anymore. If old store content (from about 5 years ago) has been used, it is important to do a random sample check for a few channels and components to check if the naming is correct (at least the flowname should be in the name). Important here is that if two flows that are on the same runtime used a store element (from the old store), that those flows do not have the same name.
- Correct naming of various OSGi components. In most cases, this will not cause any problems. However, should you have any custom configuration of these components, consider these before migration. With 'correct naming of various OSGi components' we mean that for the migration only 'default generated components' from eMagiz, with names that are known to eMagiz are used when generating flows.
- For example, we will not consider any custom connection to other models when migrating. A custom connection is a manually adjusted JMS connection between client and server.
- Validate whether you use any all-entry constructions and, even more important, whether you have any REST or SOAP endpoint hosted outside of an all-entry. To prepare yourself for these scenarios, please check out these migration paths:
4.1.4 Special cases & handling
- For properties with a relative path to a location inside the runtime, please use the Linux relative path notation and store that data inside the /tmp/ folder. The path always begins with a forward slash.
- For instance, local folders of SFTP inbound adapters. Change value from <message/order/in> to </tmp/messages/order/in)
- When toggling an API Gateway all-entry, ensure all flows have the latest version pushed to deploy. Autosaved exit gates will not be toggled otherwise.
- When migrating an FTP connection ensure that "passive" mode is activated.
- In case of splitting all entries, be aware the systems in Design that have a configured hosted web service configuration yet do not have any entry will be marked as a runtime that requires an all-entry split. Please update the configuration first before proceeding to the flow migration in Create.
- Please shut down your old runtime(s) before deploying the new runtime(s) on the new architecture runtime. The migrated JMS flow can still interact with the old runtimes.
- Should any queue starting with command or emagiz still remain after the complete migration to the next-generation archictecture please contact us at productmanagement@emagiz.com.
4.1.5 How to read the rest of the migration path
Below is a document describing the migration path to migrate a single runtime (i.e., connector or container) to the latest generation runtime. Note that this functionality has yet to be generally available and can only be executed after consulting your partner manager.
4.2 Update Design Architecture
The first step of this migration path is to update a part of your Design Architecture. In this update step, you will define on the runtime level (i.e., connector or container) whether a runtime is a generation 3 runtime.
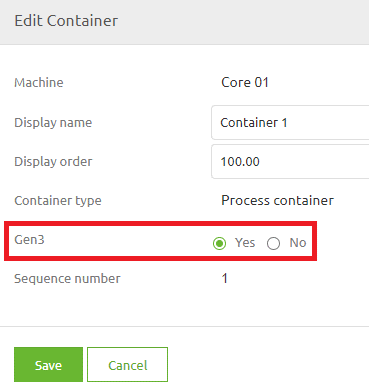
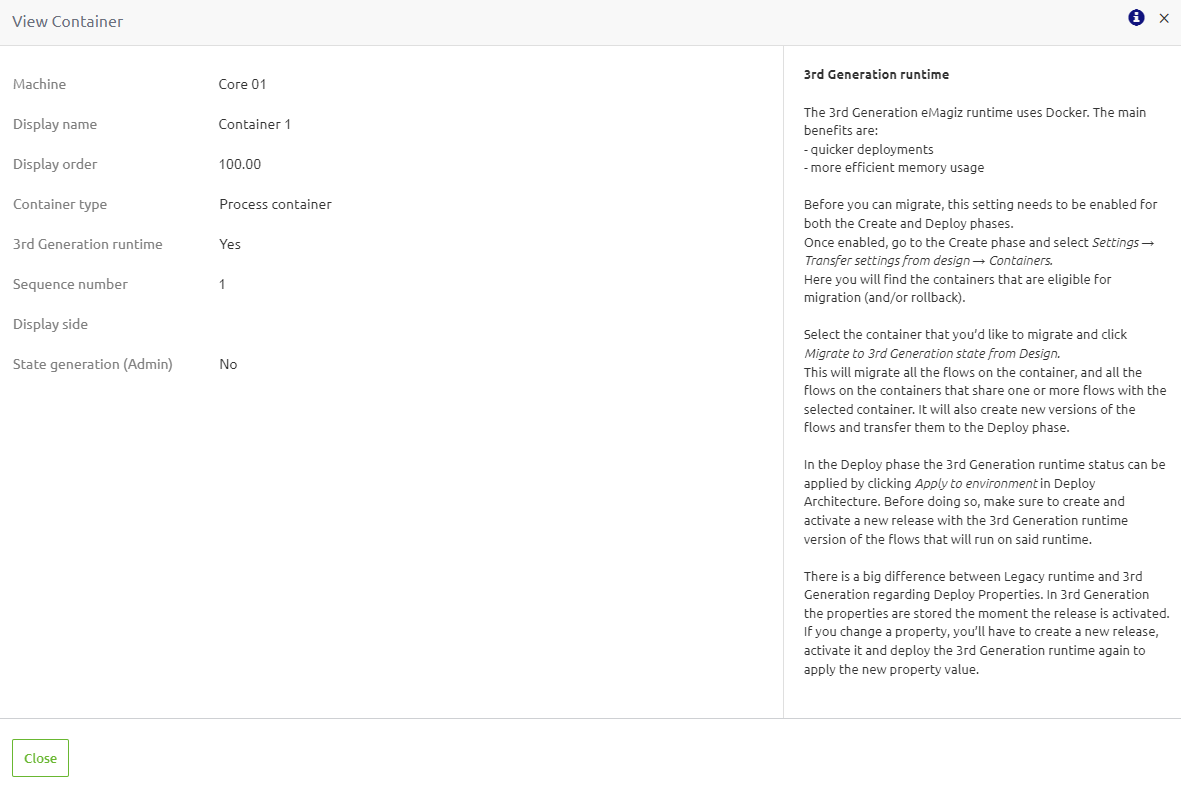
Note that we have provided an extensive help text to support your choice of whether to migrate to Generation 3. You can read the help text by pressing the information icon on the popup and selecting the Gen3 option.
4.3 Transfer Settings from Design
Now that we have indicated that a certain runtime needs to be migrated to Generation Three, the next step is Create. In Create, navigate to Settings -> Transfer Settings From Design -> Container. Here you will see all runtimes designed to be generation 3 in Design but are still configured as generation 2 in Create.

When you press the "Transfer Gen3 state from Design" button, eMagiz will automatically migrate your environment to the latest generation and update all your flows accordingly. This means that each flow will get a new version number which we need to deploy in a later phase.
On top of that, eMagiz will change the default behavior of handling errors in eMagiz flows. When migrating, you can select for which flows you want to keep your custom error handling.
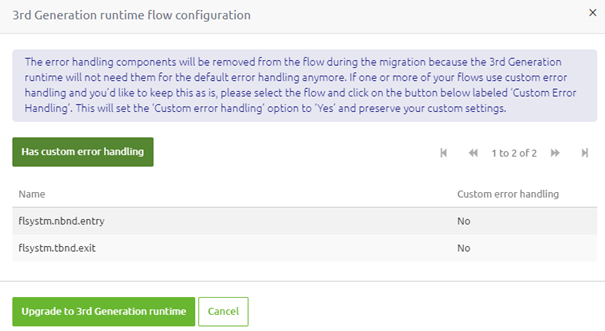
For more information on migrating your custom error handling towards the 3rd generation runtime, please see this migration path
4.4 Create a new release
After the migration, eMagiz will have created new versions of all flows on the runtime you just migrated. The next step would be to include these changes in a new release so they can be deployed. After adding the new flow versions to the release, ensure the release is "set as active." When doing so, please ensure that all infras related to "split entries" are updated by selecting the new infra version and not using the "Update to latest flow version" functionality.
4.5 Update Deploy Architecture
4.5.1 Update Cloud Template - One-Time Action
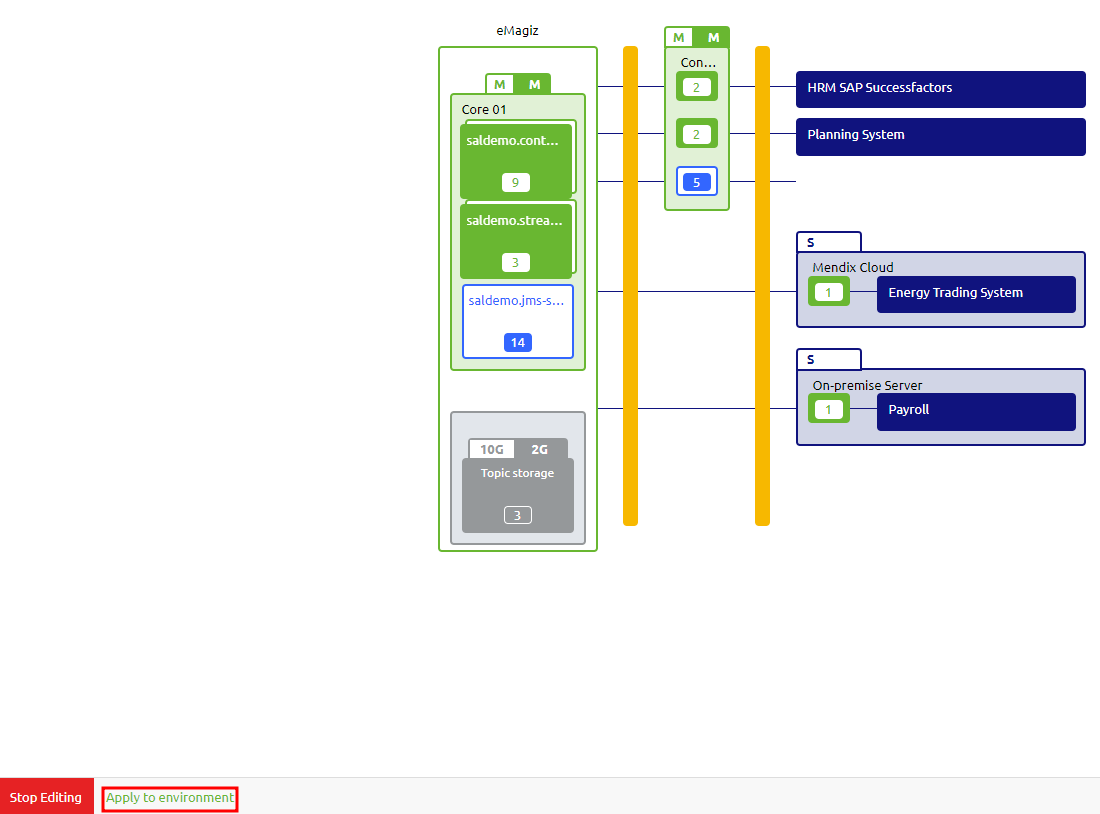
For the first runtime, you migrate to Generation 3; you must ensure that the correct cloud template is selected for which the Generation 3 runtimes can function. eMagiz will automatically select the right (and latest) template based on the configuration in Design Architecture. Once at least one container is toggled to "GEN3" on the environment of your choice eMagiz will select the latest docker template.
To update your cloud architecture, press "Apply to Environment" in Deploy Architecture. For more information on the "Apply to Environment" functionality, please check out this microlearning.
You can update your deployment plan once you confirm that the update was executed successfully (via the Details option in the context menu on the "slot" level).
4.5.2 Update A Subsequent Runtime
Apart from updating the cloud template itself, you must also update each runtime so it will run on Generation 3. To apply the changes from Design Architecture to Deploy Architecture, you need to press the "Apply to Environment" button just as you would now if you add or change a runtime in the current architecture.
4.5.3 Configure Volume mapping
How you can read and write data to a local file location will change because the docker container does not automatically have access to everything on its host server. As a result, various options are available in Docker to make this work. The various options, the pros, the cons, and how to configure each option are described in this microlearning.
4.6 Update Deployment Plan
Note that the way each runtime is deployed is changed in Generation 3. This also means that your deployment plan changes as well. For example, instead of deploying on a flow-by-flow basis, we will package the whole runtime in one image and deploy that to the machine. Therefore new steps have been added to the deployment plan to deploy changes on your machine. For example, the first time you introduce a Generation 3 runtime on a machine, you must add a Deploy Machine step to the deployment plan and remove all actions referencing the runtime you migrated. An example of what this looks like can be seen below.

4.7 Activate and execute release
Once you have updated your deployment plan, you must activate and execute the release created in step 4.3 to ensure the images are developed and deployed to the environment.
4.8 Verify whether runtime started
There are two mechanisms to verify whether the runtime started up correctly. Below you can find more information on these mechanisms.
4.8.1 Verification in Deploy Architecture
The first check can be done in Deploy Architecture itself. Here you can access the context menu on the runtime level and open the Details page of the runtime.
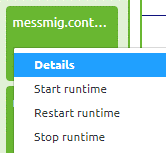
Once you have opened the Details overview, you will see a second tab called "Status." On this tab, you can see the "Status" of the runtime and execute several commands on the runtime level when in "Start Editing" mode.
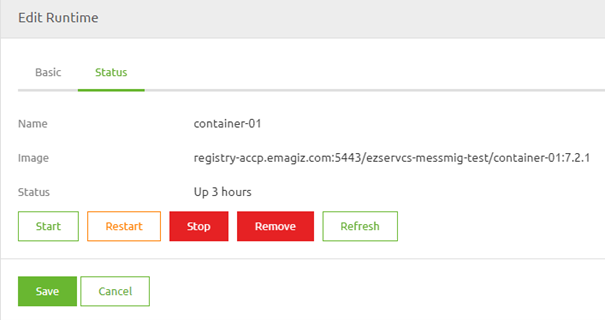
You can also define which release version is running on this runtime by looking at the last part of the image name. This part holds a reference to the release version. In this example, the release version is 7.2.1
4.8.2 Verification Log Entries
On top of this verification, you can check the Log Entries in Manage to see whether your runtime has successfully started up. You can search for the key phrase "Started eMagiz" to see which runtimes have been started (or you can filter on a specific runtime).

4.8.3 Verification Queue Statistics
In case the following queues are listed in the "Problematic queue" section more than 10 minutes after succesfully deploying the complete model to the next-generation architecture you should take action with the help of the Queue Browser (Explanation). In here you can search on "jmx" and "logging". After you have searched for either one (i.e. jmx) you can open the queue to verify if the messages in the queue are old or are still pouring in. If they are old you can delete all messages. If they keep being send it means that something is still running in the legacy runtime architecture. Make sure to take action on this to prevent confusion and surprises in future events. Once the queue is emptied and no messages are added anymore to the queue eMagiz will automatically delete the queue for you. Ten minutes later they will disappear from the "Problematic queue" section. If you need help please contact us via academy@emagiz.com.

4.9 Update old alerting
Please remove the alert triggers for this runtime from the old alerting triggers. This way eMagiz Support doesn't get false alerts that the runtime is down.
5. Key takeaways
- This migration path allows you to migrate a specific runtime to Generation 3
- All flows of the runtime are updated, so plan your migration
- The JMS needs to be migrated to Generation 3 as the last runtime of your model
- When executing the first migration of a runtime, additional steps are necessary to update your cloud configuration
- In case you want to use the new EDI functionality in messaging, both the connector and the process container need to be migrated to Generation 3
6. Suggested Additional Readings
- 1. Prerequisites
- 2. Key concepts
- 3. Migration Scenarios
- 4. Technical Migration Path
- 5. Key takeaways
- 6. Suggested Additional Readings
